【MFC】1、
resizehttp://blog.csdn.net/huangxy10/article/details/75986752、
模态对话框与非模态对话框http://blog.csdn.net/lanzily99/article/details/8053278
3、fullscreen
http://blog.csdn.net/sea310/article/details/7676867
4、Profile
http://blog.csdn.net/shuaiby/article/details/8650113
5、国际化(多语言)
http://www.cnblogs.com/xianyunhe/archive/2011/09/02/2163842.html
http://blog.csdn.net/akof1314/article/details/6321628
【libvlc】
1、播放器
http://blog.csdn.net/leixiaohua1020/article/details/42363079
2、Log
http://www.videolan.org/developers/vlc/doc/doxygen/html/group__libvlc__log.html
3、OSD
http://m.blog.csdn.net/blog/yuanjiajunzm/8262502
5、Event
http://m.blog.csdn.net/blog/wsooth2008/6787780
http://www.cnblogs.com/qq78292959/archive/2010/11/04/2077000.html
posted @
2015-10-21 17:03 lfc 阅读(428) |
评论 (0) |
编辑 收藏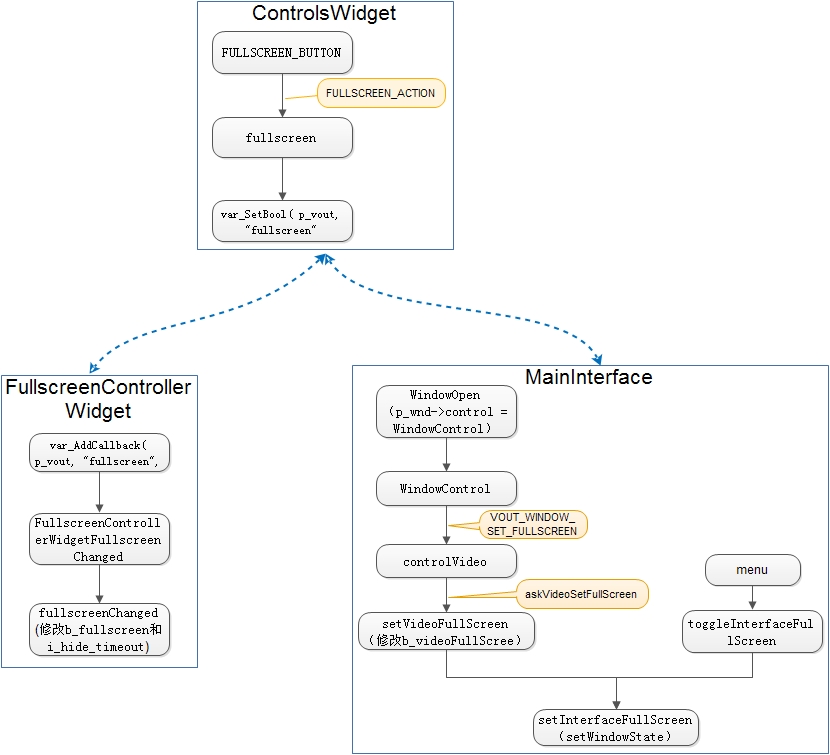
posted @
2015-10-21 13:24 lfc 阅读(254) |
评论 (0) |
编辑 收藏
摘要: 【AWB】参考:http://m.blog.csdn.net/blog/wzwxiaozheng/38434391关键步骤:1、通过静态白平衡校正,算出sensor针对白点的色温曲线(RG,BG,色温的关系)。2、通过分block的带权重的白点检测,找到图像中的白点(block),从而定位出图像的色温。注: 权重高低一是看块中白色点数量,二是看rg/bg到色温曲线的距离。 ...
阅读全文
posted @
2015-09-14 11:45 lfc 阅读(1166) |
评论 (0) |
编辑 收藏 0x00 前置信息
VLC是一个非常庞大的工程,我从它的架构及流程入手进行分析,涉及到一些很细的概念先搁置一边,日后详细分析。
0x01 源码结构(Android Java相关的暂未分析)
# build-android-arm-linux-androideabi/:第三方库。 # modules/:模块代码。 # modules/demux: 解复用模块代码。 # modules/codec: 解码模块相关代码。 # modules/access: 访问模块相关代码。 # 其他:未详细分析。 # src/: VLC架构核心代码。 # src/config/: 从命令行和配置文件加载配置,提供功能模块的读取和写入配置。 # src/control/: 提供动作控制功能,如播放/暂停,音量管理,全屏,日志等。 # src/extras/: 平台特殊性相关代码。 # src/modules/: 模块管理。 # src/network/: 提供网络接口。 # src/posix/: 多线程相关。 # src/osd/: 显示屏幕上的操作。 # src/interface/ : 提供代码中可以调用的接口中,如按键后硬件作出反应。 # src/playlist/: 管理播放功能,如停止,播放,下一首,随机播放等。 # src/text/: 字符集。 # src/input/: 输入流相关代码。 # src/video_output/ : 初始化视频播放器,把从解码器获得的数据处理后播放。 # src/audio_output/ : 初始化音频混合器,把从解码器获得的数据处理后播放。 # src/stream_output/: 输出音频流和视频流到网络。 # src/test/: libvlc测试模块。 # src/misc/: libvlc使用的其他部分功能,如线程系统,消息队列,CPU的检测,对象查找系统,或平台的特定代码。 # 其他:未详细分析。
0x02 基础概念
对于一个视频的播放,播放器的执行步骤大致如下:
- 读取原始数据
- 解复用
- 解码
- 显示
VLC在包含以上概念的基础上,又抽象出几个其他概念,先列出VLC中抽象出来的重要概念:
- playlist: playlist表示播放列表,VLC在启动后,即创建一个playlist thread,用户输入后,动态创建input。
- input: input表示输入,当用户通过界面输入一个文件或者流地址时,input thread 被动态创建,该线程的生命周期直到本次播放结束。
- access: access表示访问,是VLC抽象的一个层,该层向下直接使用文件或网络IO接口,向上为stream层服务,提供IO接口。
- stream: stream表示流,是VLC抽象的一个层,该层向下直接使用access层提供的IO接口,向上为demux层服务,提供IO接口。
- demux: demux表示解复用,是视频技术中的概念,该层向下直接使用stream层提供的IO接口,数据出来后送es_out。
- es_out: es_out表示输出,是VLC抽象的一个层,该层获取demux后的数据,送decode解码。
- decode: decode表示解码,是视频技术中的概念,获取es_out出来的数据(通过一个fifo交互),解码后送output。
- output: output表示输出,获取从decode出来的数据,送readerer。
- readerer: readerer表示显示,获取从output出来的数据(通过一个fifo交互),然后显示。
下图显示了这些抽象的概念的关系,其中蓝色表示VLC抽象的概念。

0x04 架构综述
VLC的整体框架是设计成一套module的管理机制,将功能分类并抽象成modules。
VLC main: player的main。初始化libVLC 并加载用户界面。
libVLCcore:libvlc的核心,抽象出了一个libvlc_instance_t 对象,提供modules的装载/卸载机制。
modules: modules提供具体的功能,比如上面的access,demux,decode就是以一个模块的形式存在。
External libraries:外部开源库。
模块的加载方式:
首先模块先将自身注册到VLC中,代码片段如:
vlc_module_begin() ... vlc_module_end()
然后在需要加载模块的时候,调用module_need接口,去找到合适的模块。找到合适的模块后,会执行注册中设置的回调方法,诸如Open*名字的方法。
同样自己可以实现模块,只需要按照VLC模块的标准即可。VLC中很多模块就是通过外部的开源库实现的。
vlc中模块大致分类:

0x05 流程分析
首先,给出流程图,参照该图,再继续下面的流程分析,绿色线表示打开VLC后的执行操作;黑色线表示用户输入一个视频后的执行操作;蓝色线从红色圈开始,表示开始播放输入流后的数据流向。

(1) main函数(vlc/bin/vlc.c)
- 参数信号处理相关,不详分析。
- 调用libvlc_new()初始化一个libvlc_instance_t实例。(libvlc_instance_t is opaque. It represents a libvlc instance)
2.1 调用libvlc_InternalCreate创建一个libvlc_int_t。(This structure is a LibVLC instance, for use by libvlc core and plugins.)
2.2 调用libvlc_InternalInit初始化libvlc_int_t实例。
2.3 初始化libvlc_instance_t其他成员。 - 调用libvlc_set_exit_handler设置VLC退出时的回调函数。
- 调用libvlc_add_intf添加模块。
4.1 获取playlist,如果为空,则调用playlist_Create创建一个playlist结构,并调用playlist_Activate创建新的playlist线程Thread(src/playlist/thread.c)。
4.2 调用intf_Create创建一个默认的interface。
4.2.1 调用vlc_custom_create创建一个vlc object(intf_thread_t)。
4.2.2 注册一个添加interface的回调方法。
4.2.3 调用module_need加载一个interface模块。 - 调用libvlc_playlist_play,如果播放列表不为空,并且被设置为自动播放,则播放播放列表内容。
- 信号处理相关,不详分析。
(2) 创建一个输入
- 初始化成功后,程序运行在playlist的线程Thread(src/playlist/thread.c)中,循环接收界面输入的请求。
- 当输入一个新的文件或者流地址,在PlaylistVAControl获得信号,并发送该信号。
- Thread接收到播放请求后,在LoopRequest中调用PlayItem方法。
3.1 调用input_Create创建一个input结构,并初始化各种成员,其中包括调用input_EsOutNew创建p_es_out_display(es_out)。
3.2 调用input_Start创建一个input线程Run(src/input/input.c)。
(3) 初始化输入
调用Run(src/input/input.c)中的Init方法,开始初始化。
- 调用input_EsOutTimeshiftNew新建一个50M的Timeshift(暂停缓存),包括创建并初始化p_es_out(es_out),与后续步骤9相关。
- 设置input的状态为OPENING_S。
- 调用InputSourceInit。
3.1 调用input_SplitMRL分解输入uri。
3.2 以stream形参为NULL调用demux_New加载"access_demux"模块。
3.3 如果没有合适的"access_demux"模块,则调用access_New创建一个实际的access。
3.3.1 调用vlc_custom_create创建access_t结构体。
3.3.2 调用module_need加载合适的access模块。
3.3.3 调用access模块的Open方法,以avio模块为例。
3.3.3.1 调用vlc_init_avformat初始化VLC即avformat环境。
3.3.3.2 调用avio_open2打开该uri。
3.3.3.3 设置access的IO方法指针。
3.4 调用stream_AccessNew创建一个stream。
3.4.1 根据模式(stream/block)设置steam层的IO方法指针。stream层的IO方法实际指向access层对应的IO方法指针。
3.4.2 为stream层的缓冲申请并初始化内存。
3.4.3 调用AStreamPrebufferStream执行一次读操作。
3.5 调用stream_FilterChainNew,Add stream filters(源码描述)。
3.6 调用demux_New创建一个demux。
3.6.1 调用vlc_custom_create创建demux_t结构体。
3.6.2 调用module_need加载合适的demux模块。
3.6.3 调用demux模块的Open方法,以avformat/demux模块为例。
3.6.3.1 调用stream_Peek从stream层获取数据,用于分析输入的文件格式。
3.6.3.2 调用av_probe_input_format分析输入的文件格式。
3.6.3.3 设置demux_sys_t结构体部分变量的值。
3.6.3.4 调用avformat_alloc_context分配AVFormatContext结构体。
3.6.3.5 调用avio_alloc_context设置AVFormatContext结构体的AVIOContext类型成员pb,并设置read和seek方法指针。
3.6.3.6 调用avformat_open_input打开一个输入,这里的input与VLC中的input不是一个概念,关于avformat_open_input的分析详见我的另一篇文章《avformat_open_input详细分析》链接地址。
3.6.3.7 调用avformat_find_stream_info分析流信息,该方法通过读取数据初始化流以及流解码信息。
3.6.3.8 根据分析的流信息,设置fmt变量,并调用es_out_Add。
3.6.3.9 实际调用EsOutAdd(src/input/es_out.c),添加一个es_out,有几个流就做几次es_out_Add操作,比如该输入中有一个视频流和一个音频流,则作两次es_out_Add操作。
3.6.3.10 nb_chapters相关未详细分析。
3.7 设置record相关。
3.8 调用demux_Control设置demux pts delay。
3.9 调用demux_Control设置fps。 - 调用demux_Control获取输入的长度。
- 调用StartTitle显示标题。
- 调用LoadSubtitles加载字幕。
- 调用LoadSlaves,含义不详。
- 调用InitPrograms,设置es_out和decoder相关。
8.1 调用UpdatePtsDelay计算正确的pts_delay值。
8.2 sout相关可选,暂不分析。
8.3 调用es_out_SetMode,设置es_out的mode为ES_OUT_MODE_AUTO。
8.4 以DEMUX_SET_GROUP指令调用demux_Control,DEMUX_SET_GROUP/SET_ES only a hint for demuxer (mainly DVB) to allow not reading everything。 - 续8.3,实际调用EsOutControlLocked进入case ES_OUT_SET_MODE分支。
9.1 设置es_out_sys_t 的b_active和i_mode。
9.2 调用EsOutSelect方法,根据指定模块选择一个es_out。
9.3 在EsOutSelect方法中进入ES_OUT_MODE_AUTO分支,进一步调用EsSelect方法,再进一步调用EsCreateDecoder方法创建decoder。
9.3.1 调用input_DecoderNew创建一个新的decoder。
9.3.2 如果需要缓存,调用input_DecoderStartWait发送信号,开始线程等待。
9.3.3 调用EsOutDecoderChangeDelay设置decode delay。 - 续9.3.1进入decoder_New方法。
10.1 调用CreateDecoder创建decoder配置结构体。
10.1.1 调用vlc_custom_create创建一个vlc object(decoder_t)。
10.1.2 新建decode fifo。
10.1.3 调用module_need加载适配的解码模块。
10.1.3.1 调用decode模块的OpenDecoder方法,以codec/avcodec模块为例。
10.1.3.2 调用GetFfmpegCodec方法 determine codec type(源码描述)。
10.1.3.3 调用vlc_init_avcodec方法初始化解码环境。
10.1.3.4 调用avcodec_find_decoder设置AVCodec。
10.1.3.5 调用avcodec_alloc_context3分配一个AVCodecContext。
10.1.3.6 调用Init*Dec系列初始化解码环境。
10.1.4 初始化decoder_t结构体其他成员。
10.2 调用vlc_clone创建解码线程DecoderThread。 - 续10.1.3.5,以InitVideoDec为例。
12.1 为decoder_sys_t结构分配内存。
12.2 设置相关回调方法。
12.3 设置解码线程类型。
12.4 调用ffmpeg_InitCodec初始化extradata相关数据。
12.5 调用OpenVideoCodec方法,设置解码的长宽及采用率,进一步调用avcodec_open2打开codec。 - 根据需要,设置线程优先级。
- 设置meta相关。
- 初始化完成,设置该input的状态为PLAYING_S。
(4) 播放输入
MainLoop(src/input/input.c)
- 调用MainLoopDemux访问demuxer去demux数据。
- 进一步调用在加载demux模块时设置的demux方法,同样以avformat/demux模块为例,实际调用Demux方法(module/demux/avformat/demux.c)。
2.1 调用av_read_frame读取一帧数据。
2.2 判断读取无误时,则为block_t结构分配内存,并将这一帧从AVPacket中拷贝至block_t结构中。
2.3 如果该帧是I帧,则设置I帧标致位。
2.4 时间戳处理相关,未深入分析。
2.5 根据需要调用es_out_Control设置PCR,未深入分析。
2.6 调用es_out_Send将这一帧数据发送给es_out。
2.7 调用av_free_packet释放这一帧数据。 - 调用es_out_Send后,实际调用EsOutSend(src/input/es_out.c)方法。
3.1 调用stats_Update更新相关状态,具体未详分析。
3.2 设置预读相关,如果需要预读,并且到的数据的pts小于预读需要的时间,则设置BLOCK_FLAG_PREROLL标志位。
3.3 检查sout mode,具体有sync 和async mode,异同未详细分析。
3.4 如果设置record,将数据dup后送decoder。
3.5 调用input_DecoderDecode将block_t的数据送至decode fifo中。
3.5.1 判断控制速度线程等待相关信息,具体未详细分析。
3.5.2 如果decode fifo超过最大长度,则清空重置decode fifo。
3.5.3 调用block_FifoPut将该block_t的数据压入decode fifo,并通知读取线程。
3.6 格式变化判断处理相关,未详细分析。
3.7 字幕处理相关,未详细分析。 - 续3.5进入decode read thread,即DecoderThread(src/input/decoder.c)。
4.1 调用block_FifoGet方法,从decode fifo中获取数据。
4.2 基于某些条件,发送停止等待消息给其他线程,未详细分析。
4.3 调用DecoderProcess方法开始decode a block。
4.4 判断输入流的格式,调用不同的方法,这里以视频流为例,调用DecoderProcessVideo方法。
4.5 packetizer相关为深入分析,在DecoderProcessVideo方法中进一步调用DecoderDecodeVideo方法。 - 续4.5调用pf_decode_video,这里以avcodec模块的decoder为例,即DecodeVideo(modules/codec/avcodec/video.c)方法,在该方法中,开始真正的解码。
5.1 如果在Demux中获取的流信息中包含新的extradata,并且原来的extradata数据为空,则调用ffmpeg_InitCodec初始化 codec,如果b_delayed_open为true,则调用OpenVideoCodec重新打开codec。
5.2 调用av_init_packet初始化解码数据包。
5.3 调用avcodec_decode_video2解码数据。
5.4 调用av_free_packet释放内存。
5.5 计算pts值,返回解码后的数据。
5.6 如果opaque为空,则调用ffmpeg_NewPictBuf方法创建一个新的picture buffer。具体调用回调指针pf_vout_buffer_new指向的vout_new_buffer,进一步调用 input_resource_RequestVout最终调用VoutCreate。
5.6.1 调用vlc_custom_create创建一个vlc object(vout_thread_t)。
5.6.2 调用spu_Create初始化sub picture unit。
5.6.3 调用vlc_clone创建一个output线程Thread(src/video_output/video_output.c)。
5.6.4 output线程循环调用vout_control_Pop,首次进入ThreadControl方法中,执行ThreadStart方向,创建picture fifo(p->decoder_fifo)。 - pf_decode_video返回后,解码后的数据保存在p_pic中,进一步调用DecoderPlayVideo方法,在该方法中调用vout_PutPicture将解码后的数据压入picture fifo中。
- 当picture fifo中有数据后,vout线程调用ThreadDisplayPicture中的ThreadDisplayPreparePicture方法。
7.1 调用picture_fifo_Pop从picture fifo中获取解码后的数据。
7.2 如果延迟太大,并且设置延迟丢帧,则丢掉该帧数据。 - 调用ThreadDisplayRenderPicture显示图像。
0x06 总结
对VLC的流程分析,主要通过跟踪数据流向的方式展开。对于最后显示部分的分析还不足,另外很多细节尚未深入。
参考:
- http://blog.csdn.net/tx3344/article/details/8517062
- http://my.oschina.net/xiaot99/blog/197555
posted @
2015-08-13 16:02 lfc 阅读(821) |
评论 (0) |
编辑 收藏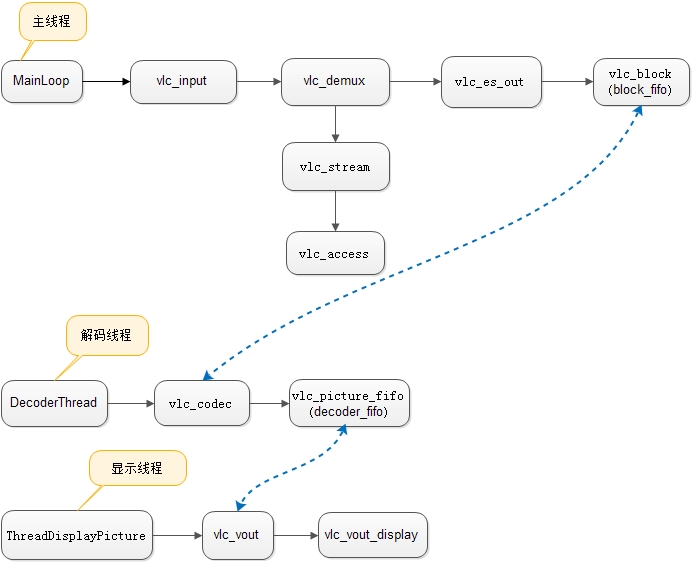
posted @
2015-08-12 20:21 lfc 阅读(264) |
评论 (0) |
编辑 收藏1 Inter prediction
Inter prediction is the process of predicting a block of luma and chroma samples from a picture that has previously been coded and transmitted, a reference picture. This involves selecting a prediction region, generating a prediction block and subtracting this from the original block of samples to form a residual that is then coded and transmitted. The block of samples to be predicted, a macroblock partition or sub-macroblock partition, can range in size from a complete macroblock, i.e. 16×16 luma samples and corresponding chroma samples, down to a 4×4 block of luma samples and corresponding chroma samples.
帧间预测是从已经被编码和传输的以前的图片(参考图片)中预测亮度、色度块的过程。这其中包括选择预测区域、生成预测块、从原始块中抽取生成残差和编码传输这几个环节。用于预测的采样块(macroblock partition or sub-macroblock partition)的大小,从一个完整的macroblock(16x16)到4x4的大小不等。
The reference picture is chosen from a list of previously coded pictures, stored in a Decoded Picture Buffer, which may include pictures before and after the current picture in display order (Chapter 5). The offset between the position of the current partition and the prediction region in the reference picture is a motion vector. The motion vector may point to integer, half- or quarter-sample positions in the luma component of the reference picture. Half- or quarter-sample positions are generated by interpolating the samples of the reference picture. Each motion vector is differentially coded from the motion vectors of neighbouring blocks
参考图片从存放于DPB的以前被编码的图片列表中选择,该图片从显示顺序上可以来自当前图片前,也可以来自当前图片后。当前partition与参考图片中预测区域的offset叫做运动向量。运动向量可以以整数像素、半像素或者四分之一像素为单位。半像素和四分之一像素为单位的移动向量,通过对参考图片进行插值来获得。当前blocks与邻居blocks的运动向量取差值,然后被编码传输。
The prediction block may be generated from a single prediction region in a reference picture, for a P or B macroblock, or from two prediction regions in reference pictures, for a B macroblock [i]. Optionally, the prediction block may be weighted according to the temporal distance between the current and reference picture(s), known as weighted prediction. In a B macroblock, a block may be predicted in direct mode, in which case no residual samples or motion vectors are sent and the decoder infers the motion vector from previously received vectors.
预测block可以基于单一的参考图像的预测region来生成,比如P或B macroblock,也可以基于参考图像里的两个预测region来生成,比如B macroblock。可选的,预测block可以根据当前图片和参考图片的时域距离进行加权预测。在B macroblock,可以采用direct mode来预测,这样没有任何的残差和运动向量需要传输,解码器根据之前接收到的运动向量进行预测。
To summarize the process of coding an inter-predicted macroblock (note that the steps need not occur in this exact order):
帧间预测编码步骤总结如下:
1. Interpolate the picture(s) in the Decoded Picture Buffer to generate 1/4-sample positions in the luma component and 1/8-sample positions in the chroma components. (section6.4.2).
对DPB下的图片进行插值处理,以生成亮度1/4像素(色度1/8像素)为单位的图像。
2. Choose an inter prediction mode from the following options:
选择帧内预测的模式:
(a) Choice of reference picture(s), previously-coded pictures available as sources for prediction. (section 6.4.1).
从已编码的图像中选择用于参考的图像
(b) Choice of macroblock partitions and sub-macroblock partitions, i.e. prediction block sizes. (section 6.4.3).
从参考图像中选择macroblock partions和sub-macroblock partitions
(b) Choice of prediction types:
选择预测类型:
(i) prediction from one reference picture in list 0 for P or B macroblocks or list 1 for B macroblocks only (section 6.4.5.1).
从list0中的一个参考图像进行预测(P或B| macroblocks),还是从list1中的参考图像进行预测(B macroblocks only)。
(ii) bi-prediction from two reference pictures, one in list 0 and one in list 1, B macroblocks only, optionally using weighted prediction (section 6.4.5.2).
分别从list0和list1中的参考图像进行双向预测,可选择的使用加权预测,B macroblocks only。
3. Choose motion vector(s) for each macroblock partition or sub-macroblock partition, one or two vectors depending on whether one or two reference pictures are used.
为每一个macroblock partition or sub-macroblock partition选择移动向量(有多少给参考图片,就有多少个运动向量)
4. Predict the motion vector(s) from previously-transmitted vector(s) and generate motion vector difference(s). Optionally, use Direct Mode prediction, B macroblocks only. (section 6.4.4).
从相邻的已编码传输的运动向量进行预测,计算向量差。可选的,B macroblocks可以使用Direct Mode预测。
5. Code the macroblock type, choice of prediction reference(s), motion vector difference(s) and residual. (Chapters 5 and 7).
把macroblock类型,选择的参考帧,运动向量差和残差进行编码。
6. Apply a deblocking filter prior to storing the reconstructed picture as a prediction reference for further coded pictures. (section 6.5).
进行环路滤波,并保存起来作为以后图片的预测参考用。
1.1 Macroblock partitions
Each 16×16 P or B macroblock may be predicted using a range of block sizes. The macroblock is split into one, two or fourmacroblock partitions:
用于预测的macroblock可以分成多种block size:
(a) one 16×16 macroblock partition (covering the whole MB),
(b) two 8×16 partitions,
(c) two 16×8 partitions or
(d) four 8×8 partitions.
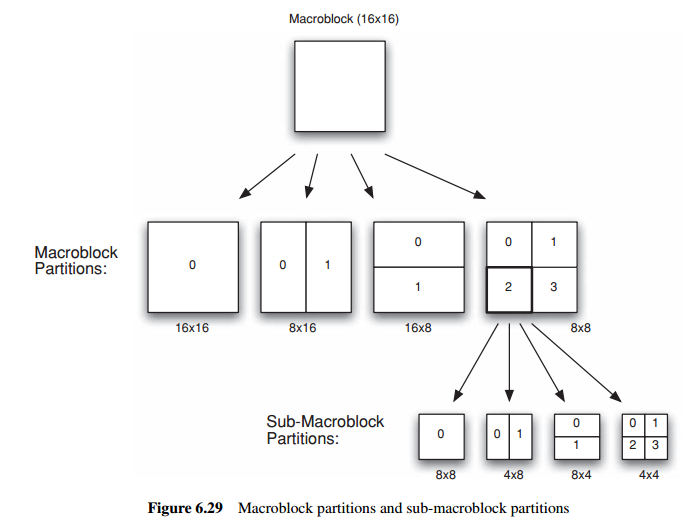
If 8×8 partition size is chosen, then each 8×8 block of luma samples and associated chroma samples, a sub-macroblock, is split into one, two or four sub-macroblock partitions):
8x8的macroblock,又可以细分为多种sub-macroblock partition
one 8×8, two 4×8, two 8×4 or four 4×4 sub-MB partitions (Figure 6.29).
Each macroblock partition and sub-macroblock partition has one or two motion vectors(x, y), each pointing to an area of the same size in a reference frame that is used to predict the current partition. A partition in a P macroblock has one reference frame and one motion vector; a partition in a B macroblock has one or two reference frames and one or two corresponding motion vectors. Each macroblock partition may be predicted from different reference frame(s).
当前图像macroblock partition和sub-macroblock partition拥有一个或两个运动向量(x,y),分别指向参考图像同样大小的macroblock partition,P macroblock里面的partition拥有一个参考帧和对应的一个运动向量;B macroblock里面的partition拥有一个或两个参考帧和对应的一个或两个运动向量。每一个macroblock partition可以从不同的参考帧进行预测。
However, the sub-macroblock partitions within an 8×8 sub-macroblock share the same
reference frame(s)
1.2 Motion vector prediction
Encoding a motion vector for each partition can cost a significant number of bits, especially if small partition sizes are chosen. Motion vectors for neighbouring partitions are often highly correlated and so each motion vector is predicted from vectors of nearby, previously coded partitions. A predicted vector, MVp, is formed based on previously calculated motion vectors and MVD, the difference between the current vector and the predicted vector, is encoded and transmitted. 运动向量可以从邻近的已编码的partition预测得到的(MVp),然后计算当前实际运动向量与预测运动向量的差值(MVD)用于编码传输。
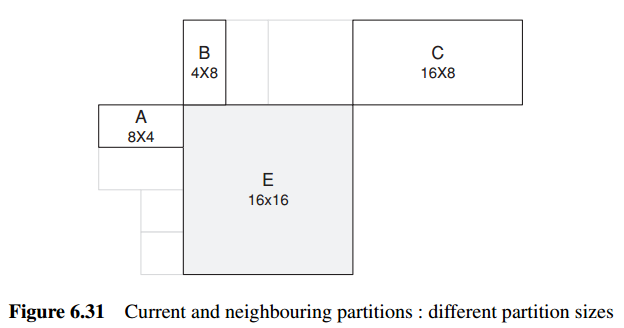
Let E be the current macroblock, macroblock partition or sub-macroblock partition, let A be the partition or sub-macroblock partition immediately to the left of E, let B be the partition or sub-macroblock partition immediately above E and let C be the partition or sub-macroblock partition above and to the right of E.
用于预测的邻近macroblock partition或sub-macroblock partition,基于以下原则进行选择:
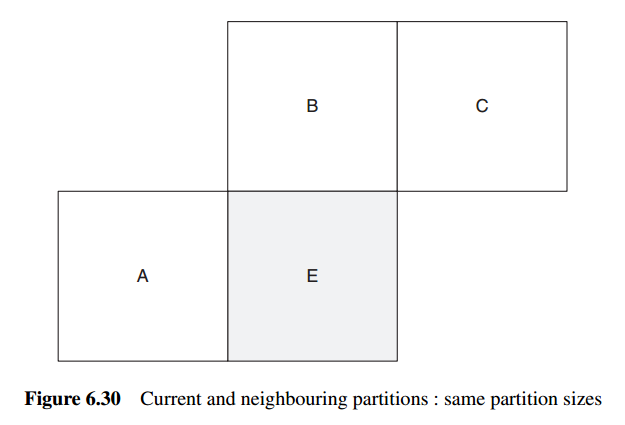
If there is more than one partition immediately to the left of E, the topmost of these partitions is chosen as A. If there is more than one partition immediately above E, the leftmost of these is chosen as B.
预测运行向量(MVP)的计算,遵循以下原则:
1. For transmitted partitions excluding 16×8 and 8×16 partition sizes, MVp is the median of the motion vectors for partitions A, B and C.
2. For 16×8 partitions, MVp for the upper 16×8 partition is predicted from B and MVp for the lower 16×8 partition is predicted from A.
3. For 8×16 partitions, MVp for the left 8×16 partition is predicted from A and MVp for the right 8×16 partition is predicted from C.
4. For skipped macroblocks, a 16×16 vector MVp is generated as in case (1) above, as if the block were encoded in 16×16 Inter mode.
If one or more of the previously transmitted blocks shown in the figure is not available, e.g. if it is outside the current picture or slice, the choice of MVp is modified accordingly. At the decoder, the predicted vector MVp is formed in the same way and added to the decoded vector difference MVD. In the case of a skipped macroblock, there is no decoded vector and a motion-compensated macroblock is produced using MVp as the motion vector.
如果某些预测用的macroblock partition不存在(当前macroblock partition处于边缘位置),则根据具体情况来调整。
在解码端,MVp按照同样的方法来生成,然后加上码流中传输的MVD,还原当前时间的运动向量。对应SKIP macroblock,码流中不传输MVD,直接拿MVp作为当前的运动向量。
1.2.1 Bipredicted macroblock motion vector prediction
A bipredicted macroblock in a B slice has two motion vectors.
B slice的双向预测macroblock有两个运动向量,这里要区分两种情况:
1、If one reference frame is a past
frame and the other is a future frame, each of the two vectors is predicted from neighbouring motion vectors that have the same temporal direction, i.e. a vector for the current macroblock pointing to a past frame is predicted from other neighbouring vectors that also point to past frames.
如果其中一个参考帧在过去,另一个在未来,那么这两个运动向量分别从邻近macroblock的运行向量预测得来。注意邻近的macroblock要具有一致的时域方向。
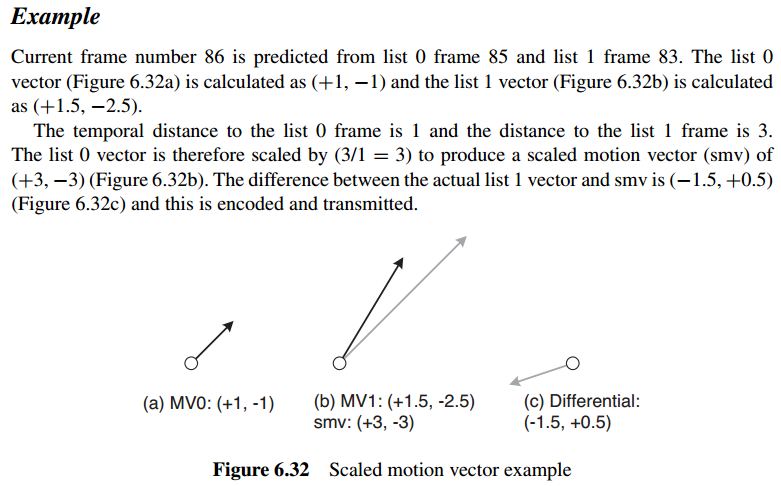
2、If both reference frames are past frames, relative to the current frame, or both are future frames, then one of the vectors is encoded as ascaled motion vector. The vector pointing to the list 0 reference (MV0) is encoded as described above and a motion vector is calculated by scaling MV0 based on the temporal distances between the current frame, the list 0 frame and the list 1 frame. The list 1 vector (MV1) is then encoded differentially from the scaled motion vector.
如果两个运动向量相对于当前macroblock都是来自过去或者未来,那么指向list0的运动向量会被编码传输(MV0),然后指向list0的运动向量会对比list1与当前帧时域的关系进行scale(smv),然后算出MV1和MV0的差值,再进行编码传输(解码端可以通过该差值和MV0来还原MV1)。
注:
隔得远,理论上运动向量大。固要把MV0按比例放大/缩写,这样MV0和MV1之间的差值才会小,利于压缩传输。
1.2.2 Direct mode motion vector prediction
No motion vector is transmitted for a B slice macroblock or partition encoded in direct mode. Instead, the decoder calculates list 0 and list 1 vectors based on previously coded vectors and uses these to carry out bipredicted motion compensation of the decoded residual samples
当B slice macroblock or partion采用direct mode进行编码时,不传输运动向量,解码器通过计算之前编码好的list0和list1的运动向量,获取当前macroblock or partion list0和list1的运动向量。
A flag in the slice header indicates whether a spatial or temporal method shall be used to calculate the vectors for direct mode macroblocks or partitions.
Slice header下的一个标志位用于区别采用空间或时域的方式计算direct mode macroblocks or partions的运行向量。
1、 In spatial direct mode, list 0 and list 1 vectors of neighbouring previously coded macroblocks or partitions in the same slice are used to calculate the list 0 and list 1 vectors of the current MB or partition.
在spatial mode下,来自同一个slice的list0和list1的运行向量用于计算当前MB or partion的list0和list1的运动向量。
2、In temporal direct mode, the decoder carries out the following steps:
在temporal mode下,解码器采用以下步骤:
1. Find the list 0 reference frame for the co-located MB or partition in the list 1 frame. This list 0 reference becomes the list 0 reference of the current MB or partition.
2. Find the list 0 vector, MV, for the co-located MB or partition in the list 1 frame.
3. Scale vector MV based on the temporal distance between the current and list 1 frames:
this is the new list 1 vector MV1.
4. Scale vector MV based on the temporal distance between the current and list 0 frames:
this is the new list 0 vector MV0.
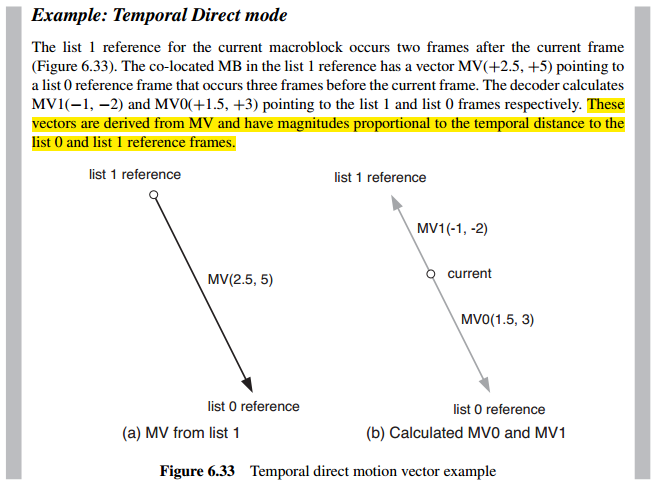
注:
隔得远,理论上运动向量大。固根据时域距离,按比例计算MV0和MV1。
refer to "the-h-264-advanced-video-compression-standard"
posted @
2015-06-01 17:12 lfc 阅读(726) |
评论 (0) |
编辑 收藏posted @
2015-05-18 11:02 lfc 阅读(257) |
评论 (0) |
编辑 收藏 我们知道,SPI数据传输可以有两种方式:同步方式和异步方式。所谓同步方式是指数据传输的发起者必须等待本次传输的结束,期间不能做其它事情,用 代码来解释就是,调用传输的函数后,直到数据传输完成,函数才会返回。而异步方式则正好相反,数据传输的发起者无需等待传输的结束,数据传输期间还可以做 其它事情,用代码来解释就是,调用传输的函数后,函数会立刻返回而不用等待数据传输完成,我们只需设置一个回调函数,传输完成后,该回调函数会被调用以通 知发起者数据传送已经完成。同步方式简单易用,很适合处理那些少量数据的单次传输。但是对于数据量大、次数多的传输来说,异步方式就显得更加合适。
对于SPI控制器来说,要支持异步方式必须要考虑以下两种状况:
- 对于同一个数据传输的发起者,既然异步方式无需等待数据传输完成即可返回,返回后,该发起者可以立刻又发起一个message,而这时上一个message还没有处理完。
- 对于另外一个不同的发起者来说,也有可能同时发起一次message传输请求。
/*****************************************************************************************************/
声明:本博内容均由
http://blog.csdn.net/droidphone原创,转载请注明出处,谢谢!
/*****************************************************************************************************/
队列化正是为了为了解决以上的问题,所谓队列化,是指把等待传输的message放入一个等待队列中,发起一个传输操作,其实就是把对应的 message按先后顺序放入一个等待队列中,系统会在不断检测队列中是否有等待传输的message,如果有就不停地调度数据传输内核线程,逐个取出队 列中的message进行处理,直到队列变空为止。SPI通用接口层为我们实现了队列化的基本框架。
spi_transfer的队列化
回顾一下通用接口层的介绍,对协议驱动来说,一个spi_message是一次数据交换的原子请求,而spi_message由多个 spi_transfer结构组成,这些spi_transfer通过一个链表组织在一起,我们看看这两个数据结构关于spi_transfer链表的相 关字段:
- struct spi_transfer {
- ......
- const void *tx_buf;
- void *rx_buf;
- ......
-
- struct list_head transfer_list;
- };
-
- struct spi_message {
- struct list_head transfers;
-
- struct spi_device *spi;
- ......
- struct list_head queue;
- ......
- };
可 见,一个spi_message结构有一个链表头字段:transfers,而每个spi_transfer结构都包含一个链表头字 段:transfer_list,通过这两个链表头字段,所有属于这次message传输的transfer都会挂在 spi_message.transfers字段下面。我们可以通过以下API向spi_message结构中添加一个spi_transfer结构:
- static inline void
- spi_message_add_tail(struct spi_transfer *t, struct spi_message *m)
- {
- list_add_tail(&t->transfer_list, &m->transfers);
- }
通用接口层会以一个message为单位,在工作线程中调用控制器驱动的transfer_one_message回调函数来完成spi_transfer链表的处理和传输工作,关于工作线程,我们留在后面讨论。
spi_message的队列化
一个或者多个协议驱动程序可以同时向控制器驱动申请多个spi_message请求,这些spi_message也是以链表的形式被过在表示控制器的spi_master结构体的queue字段下面:
- struct spi_master {
- struct device dev;
- ......
- bool queued;
- struct kthread_worker kworker;
- struct task_struct *kworker_task;
- struct kthread_work pump_messages;
- spinlock_t queue_lock;
- struct list_head queue;
- struct spi_message *cur_msg;
- ......
- }
以下的API可以被协议驱动程序用于发起一个message传输操作:
- extern int spi_async(struct spi_device *spi, struct spi_message *message);
spi_async 函数是发起一个异步传输的API,它会把spi_message结构挂在spi_master的queue字段下,然后启动专门为spi传输准备的内核工 作线程,由该工作线程来实际处理message的传输工作,因为是异步操作,所以该函数会立刻返回,不会等待传输的完成,这时,协议驱动程序(可能是另一 个协议驱动程序)可以再次调用该API,发起另一个message传输请求,结果就是,当工作线程被唤醒时,spi_master下面可能已经挂了多个待 处理的spi_message结构,工作线程会按先进先出的原则来逐个处理这些message请求,每个message传送完成后,对应 spi_message结构的complete回调函数就会被调用,以通知协议驱动程序准备下一帧数据。这就是spi_message的队列化。工作线程 唤醒时,spi_master、spi_message和spi_transfer之间的关系可以用下图来描述:

队列以及工作线程的初始化
通过Linux SPI总线和设备驱动架构之三:SPI控制器驱动这篇文章,SPI控制器驱动在初始化时,会调用通用接口层提供的API:spi_register_master,来完成控制器的注册和初始化工作,和队列化相关的字段和工作线程的初始化工作正是在该API中完成的。我先把该API的调用序列图贴出来:

图2 spi_register_master的调用序列图
如果spi_master设置了transfer回调函数字段,表示控制器驱动不准备使用通用接口层提供的队列化框架,有关队列化的初始化就不会进行,否则,spi_master_initialize_queue函数就会被调用:
- /* If we're using a queued driver, start the queue */
- if (master->transfer)
- dev_info(dev, "master is unqueued, this is deprecated\n");
- else {
- status = spi_master_initialize_queue(master);
- if (status) {
- device_del(&master->dev);
- goto done;
- }
- }
我们当然不希望自己实现一套队列化框架,所以,如果你在实现一个新的SPI控制器驱动,请记住,不要在你打控制器驱动中实现并赋值spi_master结构的transfer回调字段!进入spi_master_initialize_queue函数看看:
- static int spi_master_initialize_queue(struct spi_master *master)
- {
- ......
- master->queued = true;
- master->transfer = spi_queued_transfer;
- if (!master->transfer_one_message)
- master->transfer_one_message = spi_transfer_one_message;
-
- /* Initialize and start queue */
- ret = spi_init_queue(master);
- ......
- ret = spi_start_queue(master);
- ......
- }
该 函数把master->transfer回调字段设置为默认的实现函数:spi_queued_transfer,如果控制器驱动没有实现 transfer_one_message回调,用默认的spi_transfer_one_message函数进行赋值。然后分别调用 spi_init_queue和spi_start_queue函数初始化队列并启动工作线程。spi_init_queue函数最主要的作用就是建立一 个内核工作线程:
- static int spi_init_queue(struct spi_master *master)
- {
- ......
-
- INIT_LIST_HEAD(&master->queue);
- ......
- init_kthread_worker(&master->kworker);
- master->kworker_task = kthread_run(kthread_worker_fn,
- &master->kworker, "%s",
- dev_name(&master->dev));
- ......
- init_kthread_work(&master->pump_messages, spi_pump_messages);
-
- ......
-
- return 0;
- }
内核工作线程的工作函数是:spi_pump_messages,该函数是整个队列化关键实现函数,我们将会在下一节中讨论该函数。spi_start_queue就很简单了,只是唤醒该工作线程而已:
- static int spi_start_queue(struct spi_master *master)
- {
- ......
-
- master->running = true;
- master->cur_msg = NULL;
- ......
- queue_kthread_work(&master->kworker, &master->pump_messages);
-
- return 0;
- }
自此,队列化的相关工作已经完成,系统等待message请求被发起,然后在工作线程中处理message的传送工作。
队列化的工作机制及过程
当协议驱动程序通过spi_async发起一个message请求时,队列化和工作线程被激活,触发一些列的操作,最终完成message的传输操作。我们先看看spi_async函数的调用序列图:

图3 spi_async调用序列图
spi_async会调用控制器驱动的transfer回调,前面一节已经讨论过,transfer回调已经被设置为默认的实现函 数:spi_queued_transfer,该函数只是简单地把spi_message结构加入spi_master的queue链表中,然后唤醒工作 线程。工作线程的工作函数是spi_pump_messages,它首先把该spi_message从队列中移除,然后调用控制器驱动的 prepare_transfer_hardware回调来让控制器驱动准备必要的硬件资源,然后调用控制器驱动的 transfer_one_message回调函数完成该message的传输工作,控制器驱动的transfer_one_message回调函数在完 成传输后,必须要调用spi_finalize_current_message函数,通知通用接口层继续处理队列中的下一个message,另 外,spi_finalize_current_message函数也会调用该message的complete回调函数,以便通知协议驱动程序准备下一 帧数据。
关于控制器驱动的transfer_one_message回调函数,我们的控制器驱动可以不用实现该函数,通用接口层已经为我们准备了一个标准的 实现函数:spi_transfer_one_message,这样,我们的控制器驱动就只要实现transfer_one回调来完成实际的传输工作即 可,而不用关心何时需压气哦调用spi_finalize_current_message等细节。这里顺便也贴出 transfer_one_message的代码:
- static int spi_transfer_one_message(struct spi_master *master,
- struct spi_message *msg)
- {
- ......
- spi_set_cs(msg->spi, true);
-
- list_for_each_entry(xfer, &msg->transfers, transfer_list) {
- ......
- reinit_completion(&master->xfer_completion);
-
- ret = master->transfer_one(master, msg->spi, xfer);
- ......
-
- if (ret > 0)
- wait_for_completion(&master->xfer_completion);
-
- ......
-
- if (xfer->cs_change) {
- if (list_is_last(&xfer->transfer_list,
- &msg->transfers)) {
- keep_cs = true;
- } else {
- cur_cs = !cur_cs;
- spi_set_cs(msg->spi, cur_cs);
- }
- }
-
- msg->actual_length += xfer->len;
- }
-
- out:
- if (ret != 0 || !keep_cs)
- spi_set_cs(msg->spi, false);
-
- ......
-
- spi_finalize_current_message(master);
-
- return ret;
- }
逻辑很清晰,这里就不再解释了。因为很多时候读者使用的内核版本和我写作时使用的版本不一样,经常会有人问有些函数或者结构不一样,所以这里顺便声明一下我使用的内核版本:3.13.0 -rc6。
posted @
2015-03-11 11:32 lfc 阅读(733) |
评论 (0) |
编辑 收藏
摘要:
阅读全文
posted @
2015-02-07 22:08 lfc 阅读(367) |
评论 (0) |
编辑 收藏
参考:
http://jiya.io/archives/vlc_learn_2.html
posted @
2015-01-20 15:24 lfc 阅读(520) |
评论 (0) |
编辑 收藏