
2022年12月30日
前言本文主要分析的是bootmem_init函数。

代码分析bootmem_init函数的结构如下:

find_limits通过存储在meminfo中的内存条信息得到低端内存和高端内存的页框编号,分别放入到min、max_low、max_high中。
static void __init find_limits(unsigned long *min, unsigned long *max_low,
unsigned long *max_high)
{

*min = bank_pfn_start(&mi->bank[0]);
for_each_bank (i, mi)
if (mi->bank[i].highmem)
break;
*max_low = bank_pfn_end(&mi->bank[i - 1]);
*max_high = bank_pfn_end(&mi->bank[mi->nr_banks - 1]);
} arm_bootmem_init对低端内存区域进行管理,流程图如下:

在通过find_limits得到内存的起止页框号之后,通过bootmem_bootmap_pages计算得到需要分配bitmap的大小,分配好bitmap之后调用init_bootmem_node将起止页框号和bitmap信息写入到pgdat中。
/* arch/arm/mm/init.c */
static void __init arm_bootmem_init(unsigned long start_pfn,
unsigned long end_pfn)
{
boot_pages = bootmem_bootmap_pages(end_pfn - start_pfn);
bitmap = memblock_alloc_base(boot_pages << PAGE_SHIFT, L1_CACHE_BYTES,
__pfn_to_phys(end_pfn));
node_set_online(0);
pgdat = NODE_DATA(0);
init_bootmem_node(pgdat, __phys_to_pfn(bitmap), start_pfn, end_pfn);
} 最后就是把memblock管理的内存移交给bootmem来管理,对于memblock中的空闲区域通过free_bootmem将bitmap中对应的bit置零,而已经使用的内存,即memblock中对应的reserved的区域使用reserve_bootmem将bitmap中对应bit置1。
/* arch/arm/mm/init.c */
static void __init arm_bootmem_init()
{
/* Free the lowmem regions from memblock into bootmem. */
for_each_memblock(memory, reg) {
free_bootmem(__pfn_to_phys(start), (end - start) << PAGE_SHIFT);
}
/* Reserve the lowmem memblock reserved regions in bootmem. */
for_each_memblock(reserved, reg) {
reserve_bootmem(__pfn_to_phys(start),
(end - start) << PAGE_SHIFT, BOOTMEM_DEFAULT);
}
} 在设置好bitmap之后,接下来开始分配对应的page结构体,在分配page结构体内存之前,先统计出各个zone区域内的内存空洞,存放在zhole_size中。
/* arch/arm/mm/init.c */
static void __init arm_bootmem_free(unsigned long min, unsigned long max_low,
unsigned long max_high)
{
for_each_memblock(memory, reg) {
if (start < max_low) {
unsigned long low_end = min(end, max_low);
zhole_size[0] -= low_end - start;
}
#ifdef CONFIG_HIGHMEM
if (end > max_low) {
unsigned long high_start = max(start, max_low);
zhole_size[ZONE_HIGHMEM] -= end - high_start;
}
#endif
}
free_area_init_node(0, zone_size, min, zhole_size);
} 统计好内存空洞之后开始分配page结构体所需要的内存空间,大致流程如下:

calculate_node_totalpages通过zones_size和zholes_size计算出内存页总数和真正可用的内存页数量,分别记录在pgdat->node_spanned_pages和pgdat->node_present_pages中。
/* mm/page_alloc.c */
void __paginginit free_area_init_node(int nid, unsigned long *zones_size,
unsigned long node_start_pfn, unsigned long *zholes_size)
{
pg_data_t *pgdat = NODE_DATA(nid);
pgdat->node_id = nid;
pgdat->node_start_pfn = node_start_pfn;
calculate_node_totalpages(pgdat, zones_size, zholes_size);
alloc_node_mem_map(pgdat);
free_area_init_core(pgdat, zones_size, zholes_size);
}
alloc_node_mem_map根据pgdat->node_spanned_pages的大小确定需要分配的page结构体数量,这其中包括了内存空洞部分的区域,分配好之后将起始地址记录到pgdat->node_mem_map中,同时也记录在全局变量mem_map中。
/* mm/page_alloc.c */
static void __init_refok alloc_node_mem_map(struct pglist_data *pgdat)
{
if (!pgdat->node_mem_map) {
start = pgdat->node_start_pfn & ~(MAX_ORDER_NR_PAGES - 1);
end = pgdat->node_start_pfn + pgdat->node_spanned_pages;
end = ALIGN(end, MAX_ORDER_NR_PAGES);
size = (end - start) * sizeof(struct page);
map = alloc_remap(pgdat->node_id, size);
if (!map)
map = alloc_bootmem_node_nopanic(pgdat, size);
pgdat->node_mem_map = map + (pgdat->node_start_pfn - start);
}
if (pgdat == NODE_DATA(0))
mem_map = NODE_DATA(0)->node_mem_map;
} 最后通过free_area_init_core初始化page结构体,大致流程如下:

主要作用是设置每个zone结构体的信息,比如zone的可用空间大小等信息,并把每个zone的page结构体初始化,记录自己所属的zone和node_id,同时把page结构体状态设置为PG_reserved,这里是无差别的设置的,至于空闲的内存页会在后续的mm_init::mem_init::free_all_bootmem中重新释放出来;另外,SetPageReserved是通过宏声明的,所以是无法找到该函数的,其定义在page-flags.h中。
总结bootmem_init函数的作用是分配bitmap和page结构体所需要的空间,同时把已使用的和空闲的内存区域都标记到bitmap中,然后更新每个zone的内存信息,并把属于每个zone内存空间对应的page结构体进行初始化,且全部都设置为PG_reserved状态。
posted @
2022-12-30 09:31 lfc 阅读(243) |
评论 (0) |
编辑 收藏
2022年12月29日
1、前言
这里接着前面的
linux内存管理----paging_init,再仔细的深挖一下内核页表的建立,特别基于arm32的处理。
2、内核页表的建立
首先,内核页表的基地址已经在此前确定了,为物理起始地址的 0x00004000 偏移处,占用 16K 的连续物理内存,将新建立的页表保存在该物理地址上即可,毕竟 MMU 要求内核给出的页表基地址为物理地址。
实际上,起始地址偏移
0x00004000~0x00008000 这一段物理地址映射的是 4G 的内存,而内核只占用了最高 1G 内存,因此内核实际页表项的地址为
起始物理地址+0x00007000,不过设置到 MMU 的地址依旧是 0x00004000 偏移处。
同时,内核中只有线性映射区才会直接建立页表,而对于高端内存是无法建立页表的,这并不难理解,假设物理内存有 1.5 G,已经超出了内核本身的线性空间,自然有一部分物理内存是无法建立直接映射的,关于内核中的内存区域 ZONE 的概念可以参考 buddy 框架的建立。
有个不太好理解,但是非常重要的概念是:内核中线性映射区对于物理内存的映射仅仅是建立映射,仅仅是为了内核可以直接访问这些内存,从而进行管理,而用户空间使用内存时建立的内存映射是基于内存分配的需求。
因此,对于用户空间而言,虚拟内存到物理内存的映射必须是分配大小的粒度,也就是
4K,但是内核中可以使用 section map,也就是 1M 的映射,这并不影响内核对物理内存的管理,管理和分配时照样可以使用 4K
的粒度进行,毕竟 pfn 和 struct page 都是以 4K 页面进行索引的。
内核中使用 section 映射的好处在于:
- 节省内存,不再需要分配二级页表项 block(一个 blcok 包含 256 项二级页表项)
- 节省内存访问时间,内存访问只需要翻译一次,不需要经过二级页表项的翻译
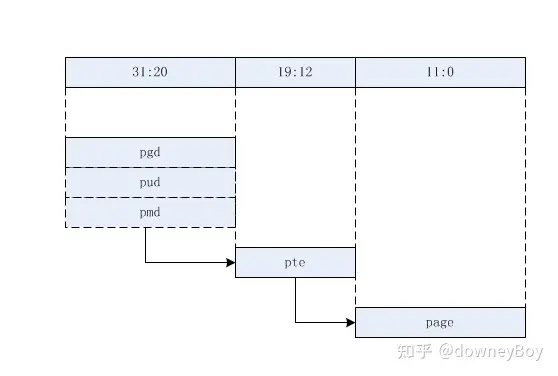
pgd、pud、pmd、pte
对于 arm32
而言,硬件上就决定了可以使用一级页表(section map)或者二级页表(page table map),对于 64
位系统而言,因为支持的线性内存空间巨大,需要使用 4 级页表,linux 为了兼容所有的硬件设备,因此内核统一支持 4 级页表(或者 5
级,还有一级 p4d 介于 pgd 和 pud 之间,基于同样的原理进行扩展的中间页表项):
- pgd:页全局目录
- pud:页上级目录
- pmd:页中间目录
- pte:页表项入口
对于不同级别的页目录(entry),对应内核中不同的数据类型:
typedef u32 pmdval_t;
typedef pteval_t pte_t;
typedef pmdval_t pmd_t;
typedef pmdval_t pgd_t[2];
typedef pteval_t pgprot_t;
对于 arm32 而言,并不需要使用到 pud 和 pmd,直接让 pgd 目录项指向 pte 即可,将 pud 和 pmd 折叠,做法就是直接让 pud 和 pmd 指向 pgd,这种折叠并没有太多成本,只是在创建页表的时候多两层函数调用而已。
大体上对应的结构为(粗略图):
硬件页表与内核页表
在 arm页表硬件实现
中介绍到,armv7 规定在实现 4K page table map 时,二级页表项为 256 项,每项占用 4 bytes,一个二级页表
block 占用 1K 的空间,但是问题在于页面大小为 4K,因此需要多个二级页表 block 存放到一个 page
中,以免造成内存的浪费。理论上一个 page 中可以存放 4 个二级页表 block。
实际情况并不是这样,由于
armv7 处理器设计的特殊性,对于存放二级页表 block 的页面,每个页面只会存放两个二级页表 block,这是硬件页表
block,剩下的 2K 空间存放的是对应的内核页表 block,也就是对同一片内存区域的映射而言,需要建立两个页表映射,为什么 arm
内核针对同一个内存映射区域会需要两个页表block?
在 x86 架构 MMU 的 page table entry 中,有三个标志位是硬件规定的:
- PTE_DIRTY:页面 dirty 位,CPU 对页面执行写操作时会将该页面的 dirty 位置位,说明页面被修改,是脏页。
- PTE_YOUNG:MMU 寻址时会对页面的该标志位置位,该标志位被置位的的页面说明在不久前被使用过,因此在页面换出的时候不会考虑该页
- PTE_PRESENT:用于判断页面是否在内存中。
由于 linux 最早是在 x86 平台上运行的,因此内存管理也就继承自 x86 的架构。但是在 armv7 对于页表的规定中,二级页表项中并不包含这些重要的标志位,因此,硬件的缺失需要通过软件来实现。
解决方案是:对应所有的二级页表 block,提供两份,一份给硬件用于 MMU 地址翻译,而另一份给 linux 内核,用于软件模拟上述标志位,其硬件规定的二级页表项为:

高 20 bits 用于物理寻址,低 12 bits 则是内存标志位,对于 linux 软件页表而言,高 20 bits 相同,而低 12
bits 用于 pte_dirty、pte_young 等标志位,这些标志位被定义在
arch/arm/include/asm/pgtable-2level.h 中:
#define L_PTE_VALID (_AT(pteval_t, 1) << 0) /* Valid */
#define L_PTE_PRESENT (_AT(pteval_t, 1) << 0)
#define L_PTE_YOUNG (_AT(pteval_t, 1) << 1)
#define L_PTE_DIRTY (_AT(pteval_t, 1) << 6)
#define L_PTE_RDONLY (_AT(pteval_t, 1) << 7)
#define L_PTE_USER (_AT(pteval_t, 1) << 8)
#define L_PTE_XN (_AT(pteval_t, 1) << 9)
#define L_PTE_SHARED (_AT(pteval_t, 1) << 10)
#define L_PTE_NONE (_AT(pteval_t, 1) << 11)
那么,软件上是如何模拟这些 x86 中的硬件标志位的呢?
- PTE_DIRTY:对于新分配的页面,先将其映射为只读,当对该页面执行写操作时,会触发 MMU fault,在异常处理程序中将标志位进行修改
- PTE_YOUNG:在页面分配的时候被置位,解除映射的时候清除
- PTE_PRESENT:其实一个虚拟页面有没有在内存中有两种情况,一种是页面压根就没被分配,另一种是被换出了,如果页面是被换出的,那么 PTE_YOUNG 会被置位,而 PTE_PRESENT 会被清除,如果是压根没有分配,两个标志位都为 0。
对于一个装有二级页表 block 的 page,它的布局为:
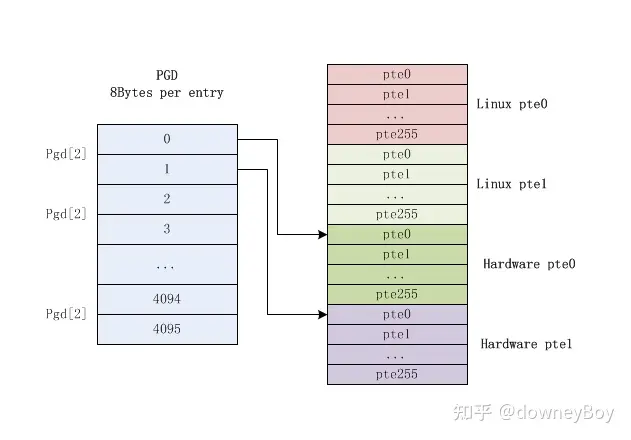
左边是一级页表项 block,而右边是一个 page 中包含的四个(两对)二级页表 block 项,硬件页表项放在软件页表项 +2048 处。
linux 页表软件上的处理
从上面的分析不难看出,linux 软件实现的页表和 arm 中硬件定义的页表是有差别的,严格来说 linux 软件在硬件页表的基础上进行了一些调整,主要为以下几点:
1: linux 内核为了兼容各种体系架构,使用了 4(5) 级页表,当然 arm 实际上使用了其中两级。
2:armv7 MMU 硬件上不支持 dirty、young 等标志位,但是内核内存管理框架需要应用这些标志,因此在软件上对每一个页表项需要额外增加模拟二级页表项
3:
鉴于 arm 硬件定义的二级页表 block 为 256 项,每项 4 bytes,占用 1K,加上软件模拟页表项为
2K,但是一个最小的页面为 4K,因此需要将 4 个二级页表 block(2个linux 软件模拟 pte block + 2个硬件 pte
block) 放到一个页面中,每个 PGD 项实际上是占用 8 bytes,因此有以下定义:
#define PMD_SHIFT 21
#define PGDIR_SHIFT 21
#define PMD_SIZE (1UL << PMD_SHIFT)
#define PMD_MASK (~(PMD_SIZE-1))
#define PGDIR_SIZE (1UL << PGDIR_SHIFT)
#define PGDIR_MASK (~(PGDIR_SIZE-1))
PMD_SIZE 被定义为一个 PMD 能够映射的内存大小,PMD_SIZE = 1 << 21 = 2M。
从硬件定义来看,每个
pte block 应该是 1M,SHIFT 值应该是 20,但是软件上的处理为:将两个 pte block 放在一个页面中,因此每个 PGD
占用 8 bytes,而 PMD = PGD,因此 PMD 也就相当于两个 pte block,两个页面也就是 2M,SHIFT 为 21。
注:以上介绍可以参考linux内核下arch/arm/include/asm/pgtable-2level.h的注释建立映射
内核线性映射内存区映射的建立在 paging_init ->
map_lowmem 函数中,对于所有的空闲内存,默认映射为 RW 属性,而对于内核而言,需要加上 X
属性,不然内核代码无法执行,尽管内核在开启 MMU
的阶段已经映射过了,但是那毕竟只是在不知道物理内存信息的情况下建立的临时映射,因此内核需要重新映射为 RWX 属性,而 dtb 占用的内存也是
RW 属性,和空闲内存一起做映射即可。
因此,内核线性空间的映射通常被分为三个部分:
- 内核镜像之前的物理内存映射,RW 属性
- 内核镜像的重新映射,RWX 属性
- 内核镜像之后的物理内存映射,RW 属性
在 map_lowmem 函数中,先是对上面所提到的三个内存区域空间进行计算,然后分别映射,建立内存映射的函数为 create_mapping,该函数接受一个 struct map_desc 类型的参数:
struct map_desc {
unsigned long virtual;
unsigned long pfn;
unsigned long length;
unsigned int type;
};
这个参数非常好理解,既然是虚拟内存到物理页面的映射,自然包括虚拟内存地址、物理页面页帧号 pfn,映射长度以及映射类型。
create_mapping 函数实现为:
static void __init create_mapping(struct map_desc *md)
{
__create_mapping(&init_mm, md, early_alloc, false);
}
create_mapping 函数就是对 __create_mapping 函数的封装,__create_mapping 的几个参数得聊一聊:
- init_mm:尽管内核初始化早期调度子系统没有就绪,但是内核静态定义了一个
init 进程,内核初始化流程就是运行在该进程中,对于任何进程都会有其对应的一份页表来描述虚拟地址到物理地址的映射,这个页表只是 pgd
block(一级页表 block),保存所有的 pgd,而所有的 pte block 是按需动态分配的。 因此,task struct
结构中保存了页表基地址,具体成员为 task->mm->pgd,对于 init 进程而言,其 struct_mm
结构也是静态定义的,因此 __create_mapping 第一个参数需要提供进程的 mm 结构,实际上主要是提供当前进程的 pgd 首地址。
- md: struct map_desc ,包括建立映射需要的几个关键参数,见上文。
- early_alloc:内存分配接口,如果是
page table 映射,使用二级页表,那么对应的二级 pte block 就需要动态分配内存,early_alloc 底层调用的还是
memblock 的内存分配接口,毕竟这时候 buddy 子系统还没有初始化完成。
- ng:
__create_mapping 传入的第四个参数为 false,这个参数实际对应 ng 标志位,这个标志位的作用在 armv7
手册中被定义的(也就是硬件决定的),为 not global bit,如果该标志为 false,表示页表是对所有 processor
可见的,如果为 true,表示页表只对特定的 processor 可见。
在 __create_mapping 中,通过 __pfn_to_phys 宏获取映射的物理地址,这个宏就是将 pfn 左移 PAGE_SHIFT bits。
接着,需要将传入的映射长度向页面对齐,再通过 pgd_offset 宏获取目标内存 pgd 的地址,这个宏首先会通过进程的 mm->pgd 获取一级页表 block 的基地址,然后通过虚拟地址的偏移获取对应的页表项。
因为是建立映射,除了
pgd 已经被创建之外,需要创建对应的 pud、pmd 和 pte 项,于是接着调用 alloc_init_pud 和
alloc_init_pmd,二级映射中不使用 pud 和 pmd,因此直接将 pud 和 pmd 指向 pgd,在
alloc_init_pmd 函数中,根据传入的参数选择映射的方式:
static void __init alloc_init_pmd(pud_t *pud, unsigned long addr,
unsigned long end, phys_addr_t phys,
const struct mem_type *type,
void *(*alloc)(unsigned long sz), bool ng)
{
pmd_t *pmd = pmd_offset(pud, addr);
unsigned long next;
do {
if (type->prot_sect &&
((addr | next | phys) & ~SECTION_MASK) == 0) {
__map_init_section(pmd, addr, next, phys, type, ng);
} else {
alloc_init_pte(pmd, addr, next,
__phys_to_pfn(phys), type, alloc, ng);
}
}
在执行 __create_mapping
时,如果需要映射的长度大于 2M(针对 arm,每个平台不同),就将需要建立映射的内存以 2M 为分割进行处理,这是因为 2M
的映射刚好对应两个二级页表 block,填充一个完整的页面,方便处理。从上面的代码可以看出,如果需要建立的映射长度大于 1M 就会调用
__map_init_section 建立 section 映射。否则就调用 alloc_init_pte 建立 4K 映射。
__map_init_section
建立 1M 的 section 映射还是比较简单的,只需要生成对应的一级页表项,前 12 bits 对应虚拟地址到物理地址的映射,后 20
bits 对应一些属性位,在用户访问使用该映射时,该一级页表项的 前12bits + 输入的虚拟地址的后 20bits
就可以找到对应的物理内存地址。
建立 4K 的映射相对要麻烦一点,因为 4K 的页面映射需要使用二级页表,如果对应页面的二级页表 block 还没有被创建,首先需要调用 alloc 申请对应物理内存来保存二级页表 block,创建完成之后需要填充对应的一级页表项。
然后就可以直接使用 pte_offset_kernel 宏获取当前页面在二级页表 block 中对应的二级页表项地址,从而在该位置上填充对应的二级页表项数据,对于 4K 的映射,一级页表项和二级页表项内容在arm页表硬件实现中已经详细讨论过。
建立二级页表项由
set_pte_ext 宏实现,实际上底层调用的是在内核启动之初获取的
list->processor->set_pte_ext,这是处理器相关的处理函数,对应的函数实现为
cpu_v7_set_pte_ext,在 arch/arm/mm/proc-v7-2level.S 中。
ENTRY(cpu_v7_set_pte_ext)
#ifdef CONFIG_MMU
str r1, [r0] // 将 r1 保存到 r0 位置,也就是把 entry 值写入对应位置
// 这是 linux pte
tst r1, #L_PTE_YOUNG
tstne r1, #L_PTE_VALID // r1 = 0x3fffe18f
eorne r1, r1, #L_PTE_NONE // r1 = 0x3fffe98f
tstne r1, #L_PTE_NONE // r1 = 0x3fffe98f
moveq r3, #0 // r3 = 0x3fffe23e
ARM( str r3, [r0, #2048]! ) // 把 r3 存到 0xefffdfc0(r0+2048),这是硬件 pte
ALT_SMP(W(nop))
ALT_UP (mcr p15, 0, r0, c7, c10, 1) @ flush_pte
#endif
bx lr
ENDPROC(cpu_v7_set_pte_ext) set_pte_ext 接受三个参数:
1、pte ,也就是 entry 需要存放的地址
2、pte value,也就是 pte 对应的值
3、ng flag,和缓存策略相关的参数。
在
set_pte_ext 中,除了设置地址映射部分之外,还需要处理大量标志位的设置(比如 YOUNG、DIRTY
bit),毕竟针对同一个页面,需要填充一个软件二级页表项和一个硬件二级页表项,硬件二级页表项给 MMU 使用,保存在 软件二级页表项 +
2048 地址处,在上面贴出的汇编代码中也有体现,而完整的汇编处理就没有贴出来了,有兴趣的可以自己去研究研究。
注:转自linux内存子系统 - 建立内核页表
posted @
2022-12-29 16:20 lfc 阅读(560) |
评论 (0) |
编辑 收藏注:
本文中都是基于ARM32来描述体系结构相关的内容
一、启动之前
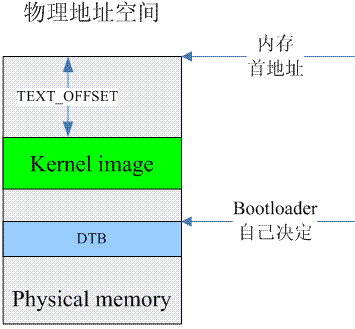
在详细描述linux kernel对内存的初始化过程之前,我们必须首先了解kernel在执行第一条语句之前所面临的处境。这时候的内存状况可以参考下图:
注:
还有一种旧的方案,不用DTB,Bootloader和Kernel之间通过ATAG传递参数,ATAG参数一般存放在Kernel image以下,TEXT_OFFSET里面,通过struct machine_desc的atag_offset参数来指定,比如s5p4418下是这样描述的:

bootloader有自己的方法来了解系统中memory的布局,然后,它会将绿色的kernel image和蓝色dtb image
copy到了指定的内存位置上。kernel image最好是位于main
memory起始地址偏移TEXT_OFFSET的位置,当然,TEXT_OFFSET需要和kernel协商好。kernel
image是否一定位于起始的main memory(memory address最低)呢?也不一定,但是对于kernel而言,低于kernel
image的内存,kernel是不会纳入到自己的内存管理系统中的。对于dtb
image的位置,linux并没有特别的要求。由于这时候MMU是turn off的,因此CPU只能看到物理地址空间。
注:
ARM32下,TEXT_OFFSET一般取0x00008000,取这个值是有深意的,因为上半部OFFSET为0x00004000的地方刚好用于存储一级页表(PGD),而下半部分前面也介绍了可能会用来存放bootloader传递的ATAG。
二、汇编时代
一旦跳转到linux kernel执行,内核则完全掌控了内存系统的控制权,它需要做的事情首先就是要打开MMU,而为了打开MMU,必须要创建linux kernel正常运行需要的页表,这就是本节的主要内容。
在体系结构相关的汇编初始化阶段,我们会准备二段地址的页表:
第一段是identity
mapping,其实就是把地址等于物理地址的那些虚拟地址mapping到物理地址上去,打开MMU相关的代码需要这样的mapping(别的CPU不知道,但是ARM
ARCH强烈推荐这么做的)。
第二段是kernel image mapping,内核代码欢快的执行当然需要将kernel
running需要的地址(kernel txt、rodata、data、bss等等)进行映射了(由于内核链接使用的虚拟地址,所以映射时也需要把链接使用的虚拟地址映射到对应的物理地址上)。具体的映射情况可以参考下图:
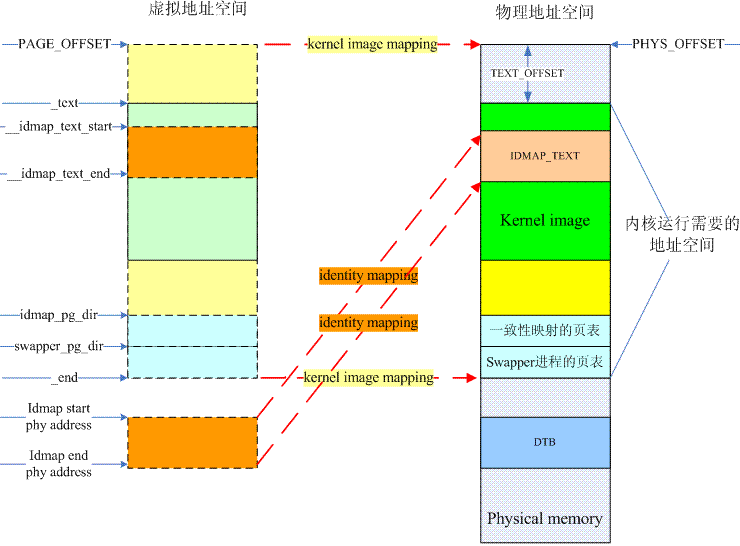
turn on
MMU相关的代码被放入到一个特别的section,名字是.idmap.text,实际上对应上图中物理地址空间的IDMAP_TEXT这个block。这个区域的代码被mapping了两次,做为kernel
image的一部分,它被映射到了__idmap_text_start开始的虚拟地址上去。此外,假设IDMAP_TEXT
block的物理地址是A地址,那么它还被映射到了A地址开始的虚拟地址上去。虽然上图中表示的A地址似乎要大于PAGE_OFFSET,不过实际上不一定需要这样的关系,这和具体处理器的实现有关(比如s5p4418的内存起始物理地址PHYS_OFFSET为0x40000000,那IDMAP_TEXT block的物理地址应该是0x4xxxxxxx,比内核虚拟地址起始地址PAGE_OFFSET要小)
注:
上图是基于ARM64的,所以idmap_pg_dir和swapper_pg_dir的位置和ARM32不同。ARM32下swapper_pg_dir对应地址是“KERNEL_RAM_VADDR - PG_DIR_SIZE”(比如0xc0008000-0x0004000=0xc0004000)。
编译器感知的是kernel
image的虚拟地址(左侧),在内核的链接脚本中定义了若干的符号,都是虚拟地址。但是在内核刚开始,没有打开MMU之前,这些代码实际上是运行在物理地址上的,因此,内核起始刚开始的汇编代码基本上是PIC的,首先需要定位到页表的位置,然后在页表中填入kernel
image mapping和identity mapping的页表项,如果传递了DTB,还会建立DTB的页表项,详细可参考linux内存管理----页表最初的初始化(从内核启动的第一段代码谈起)上的介绍。。
一旦设定完了页表,那么打开MMU之后,kernel正式就会进入虚拟地址空间的世界,美中不足的是内核的虚拟世界没有那么大。原来拥有的整个物理地址空间都消失了,能看到的仅仅剩下kernel
image mapping、identity mapping和DTB这几段地址空间是可见的。不过没有关系,这只是刚开始,内存初始化之路还很长。
补充:内核内存初始化之路,充满了不确定性,一切起源于对内存布局的未知性(直到对ATAG/DTB数据的解释后)。所以内核只能基于目前的一些已知信息(比如内存物理地址偏移PHYS_OFFSET、内核虚拟地址偏移PAGE_OFFSET、mmu的代码片段、内核代码和数据、DTB存放起始地址)来准备好内存映像(段映射);然后加入一些约定,比如:内核映像放置于内存开始TEXT_OFFSET位置下(相当于预留了TEXT_OFFSET空间),对ATAG/DTB空间大小进行了约定(比如DTB不大于2M)。
三、内存布局
在内核开启 MMU 之后,整个内存世界实际上还处于一片黑暗之中,毕竟这时候内核并不知道当前系统中物理内存的信息,只是为内核 image、dtb 建立了页表,内核只有访问这两部分才是安全的。
紧接着,memblock
内存分配器就开始工作了,这是内核中静态定义的一个内存管理器,其首要工作就是将所有物理内存纳入管理,首先从通过扫描 dtb
获取物理内存的相关信息,看清楚整个物理内存世界,然后将那些已经被使用的内存设为保留,比如内核镜像所在内存、dtb
内存、页表内存,至于其它的内存都是空闲可支配的。
收集内存布局的信息主要来自下面几条途径:
(1)choosen
node。该节点有一个bootargs属性,该属性定义了内核的启动参数,而在启动参数中,可能包括了mem=nn[KMG]这样的参数项。initrd-start和initrd-end参数定义了initial
ramdisk image的物理地址范围。
(2)memory node。这个节点主要定义了系统中的物理内存布局。主要的布局信息是通过reg属性来定义的,该属性定义了若干的起始地址和size条目。
(3)DTB header中的memreserve域。对于dts而言,这个域是定义在root
node之外的一行字符串,例如:/memreserve/ 0x05e00000
0x00100000;,memreserve之后的两个值分别定义了起始地址和size。对于dtb而言,memreserve这个字符串被DTC解析并称为DTB
header中的一部分。更具体的信息可以参考device tree基础文档,了解DTB的结构。
(4)reserved-memory
node。这个节点及其子节点定义了系统中保留的内存地址区域。保留内存有两种,一种是静态定义的,用reg属性定义的address和size。另外一种是动态定义的,只是通过size属性定义了保留内存区域的长度,或者通过alignment属性定义对齐属性,动态定义类型的子节点的属性不能精准的定义出保留内存区域的起始地址和长度。在建立地址映射方面,可以通过no-map属性来控制保留内存区域的地址映射关系的建立。
通过对DTB中上述信息的解析,其实内核已经基本对内存布局有数了,但是如何来管理这些信息呢?这也就是著名的memblock模块,主要负责在初始化阶段用来管理物理内存。一个参考性的示意图如下:

内核在收集了若干和memory相关的信息后,会调用memblock模块的接口API(例如:memblock_add、memblock_reserve、memblock_remove等)来管理这些内存布局的信息。内核需要动态管理起来的内存资源被保存在memblock的memory
type的数组中(上图中的绿色block,按照地址的大小顺序排列),而那些需要预留的,不需要内核管理的内存被保存在memblock的reserved
type的数组中(上图中的青色block,也是按照地址的大小顺序排列),详细可参考inux内存管理----memblock。
四、内存映射paging_init
最重要的是map_lowmem,借助于memblock,把可用(非reserved)的物理内存地址小于lowmem_limit的内存映射到内核空间,实际的内存映射工作在create_mapping中完成。
/* arch/arm/mm/mmu.c */
static void __init map_lowmem(void)
{
for_each_memblock(memory, reg) {
start = reg->base;
end = start + reg->size;
if (end > lowmem_limit)
end = lowmem_limit;
if (start >= end)
break;
map.pfn = __phys_to_pfn(start);
map.virtual = __phys_to_virt(start);
map.length = end - start;
map.type = MT_MEMORY;
create_mapping(&map, false);
}
}
详细可参考linux内存管理----paging_init
五、结束
目前为止,所有为内存管理做的准备工作已经完成:收集了整个内存布局的信息,memblock模块中已经保存了所有需要管理memory
region的信息,同时,系统也为所有的lowmem(reserved除外)创建了地址映射。虽然整个内存管理系统没有ready,但是通过memblock模块已经可以在随后的初始化过程中进行动态内存的分配。
有了这些基础,随后就是真正的内存管理系统的初始化了,我们下回分解。
posted @
2022-12-29 09:43 lfc 阅读(339) |
评论 (0) |
编辑 收藏
2022年12月28日
摘要: 1. 前言前面介绍了当前启动阶段的内存分配函数memblock_alloc,该内存分配函数在本篇将要介绍paging_init中用于页表和内存的分配,paging_init函数大致流程如下图所示。2. paging_init2.1 build_mem_type_table该函数根据具体的CPU架构对静态定义的mem_types数组中定义的属性进行调整。2.2 prepare_page_table该...
阅读全文
posted @
2022-12-28 19:25 lfc 阅读(468) |
评论 (0) |
编辑 收藏
1. 概述
本文首先分析arm_memblock_init函数,然后分析内核启动阶段的是如何进行内存管理的。
2. arm_memblock_init
该函数的功能比较简单,主要就是把meminfo中记录的内存条信息添加到memblock.memory中,然后把内核镜像所在内存区域添加到memblock.reserved中,arm_mm_memblock_reserve把页表所在内存区域添加到memblock.reserved中;如果使用了设备树,则使用arm_dt_memblock_reserve来保留所占用的内存,最后则是调用CPU相关的mdesc->reserve,其对应的调用为cpu_mem_reserve,该函数定义在cpu.c中。
/* arch/arm/mm/init.c */
void __init arm_memblock_init() {
for (i = 0; i < mi->nr_banks; i++)
memblock_add(mi->bank[i].start, mi->bank[i].size);
memblock_reserve(__pa(_stext), _end - _stext);
arm_mm_memblock_reserve();
arm_dt_memblock_reserve();
if (mdesc->reserve)
mdesc->reserve();
arm_memblock_steal_permitted = false;
memblock_allow_resize();
memblock_dump_all();
}
/* include/kernel/memblock.h */
struct memblock {
phys_addr_t current_limit;
struct memblock_type memory;
struct memblock_type reserved;
};
3. memblock_alloc
接下来就该执行paging_init函数了,在分析paging_init之前先来点内核启动阶段的内存管理相关的内容。从arm_memblock_init开始引入memblock数据结构,其作用是实现内核启动初期的内存管理功能,严格来说,其生命周期到paging_init::bootmem_init为止,memblock_alloc调用流程如下。
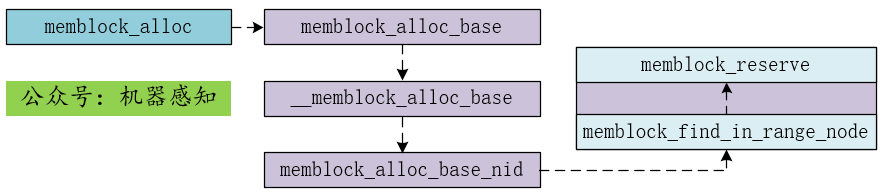
实际查找空闲内存的函数为memblock_find_in_range_node,而该函数中真正实现空闲内存查找的是for_each_free_mem_range_reverse这个宏定义。
/* mm/memblock.c */
phys_addr_t memblock_find_in_range_node()
{
for_each_free_mem_range_reverse(i, nid, &this_start, &this_end, NULL) {
if (cand >= this_start)
return cand;
}
return 0;
}
该宏定义如下,然而其中又嵌套了一个函数Orz…
/* include/linux/memblock.h */
#define for_each_free_mem_range_reverse(i, nid, p_start, p_end, p_nid) \
for (i = (u64)ULLONG_MAX, \
__next_free_mem_range_rev(&i, nid, p_start, p_end, p_nid); \
i != (u64)ULLONG_MAX; \
__next_free_mem_range_rev(&i, nid, p_start, p_end, p_nid))
首先需要说明的是,memblock.reserved标识的区域表示的是已被占用的内存区域,memblock.memory中记录的是内存条信息。现在回到__next_free_mem_range_rev函数,代码段(1)(2)的目的是找出内存条上两个reserved区域之间的内存区域,即空闲区域。找到之后再经过代码段(3)对空闲区域的起始地址和结束地址进行修正,因为代码段(1)(2)只能保证空闲区与当前内存条存在交集,并不能保证该空闲区域完全处于当前内存条之中,主要原因在于无法保证这两个reserved区域都在当前内存条上。
/* mm/memblock.c */
void __init_memblock __next_free_mem_range_rev()
{
struct memblock_type *mem = &memblock.memory;
struct memblock_type *rsv = &memblock.reserved;
/* (1) */
for ( ; mi >= 0; mi--) {
struct memblock_region *m = &mem->regions[mi];
phys_addr_t m_start = m->base;
phys_addr_t m_end = m->base + m->size;
/* (2) */
for ( ; ri >= 0; ri--) {
struct memblock_region *r = &rsv->regions[ri];
phys_addr_t r_start = ri ? r[-1].base + r[-1].size : 0;
phys_addr_t r_end = ri < rsv->cnt ? r->base : ULLONG_MAX;
/* (3) */
if (m_end > r_start) {
if (out_start)
*out_start = max(m_start, r_start);
if (out_end)
*out_end = min(m_end, r_end);
if (out_nid)
*out_nid = memblock_get_region_node(m);
return;
}
}
}
*idx = ULLONG_MAX;
}
至此,空闲区域的查找基本就结束了,回到memblock_find_in_range_node函数中,再检查一下该区域的起始地址和结束地址是否合法等等,最终就申请到了所请求大小的内存区域,最后只需要将这块内存区域标记为reserved状态就结束了内存分配的整个过程了。
/* mm/memblock.c */
int memblock_reserve(phys_addr_t base, phys_addr_t size)
{
struct memblock_type *_rgn = &memblock.reserved;
return memblock_add_region(_rgn, base, size, MAX_NUMNODES);
}
4. 总结
arm_memblock_init函数首先把记录在meminfo记录的内存条信息转移到memblock.memory中,然后把已经使用的内存区域记录到memblock.reserved中,主要包括内核镜像所占用区域、页表区域以及设备树;
memblock_alloc通过memblock中的memory和reserved中记录的信息进行内存管理,每次申请到内存之后都在memblock.reserved中进行记录。
注:
posted @
2022-12-28 16:11 lfc 阅读(383) |
评论 (0) |
编辑 收藏
摘要: 微信公众号:二进制人生专注于嵌入式linux开发。问题或建议,请发邮件至hjhvictory@163.com。更新日期:2020/1/30,转载请注明出处。内存管理系列文章:内容整理自网络和自己的认知,旨在学习交流,请勿用于商业用途,转载请注明出处。linux内存管理(一)开篇介绍linux内存管理(二)两种内存架构和linux三种内存模型linux内存管理(三)linux内存管理三级结构linu...
阅读全文
posted @
2022-12-28 11:13 lfc 阅读(604) |
评论 (0) |
编辑 收藏