kenlistian

勤学多思

  IT博客 :: 首页 :: 新随笔 ::  :: 聚合  :: 管理 ::
  412 随笔 :: 0 文章 :: 23 评论 :: 0 Trackbacks

#


string.gsub 函数有三个参数:目标串,模式串,替换串。
基本作用是用来查找匹配模式的串,并将使用替换串其替换掉:

s = string.gsub("Lua is good", "good", "bad?")
print(s)   --> Lua is bad

string.gsub 的第二个返回值表示进行替换操作的次数。例如,
下面代码计字符串中空格出现的次数:

_, count = string.gsub("test test", " ", " ")
_ 表示哑元变量

模式串
.   任意字符
%a   字母
%c   控制字符
%d   数字
%l   小写字母
%p   标点字符
%s   空白符
%u   大写字母
%w   字母和数字
%x   十六进制数字
%z   代表 0的字符


特殊字符如下:
(). % + - * ? [ ^ $
% 也作为以上特殊字符的转义字符。

[] 该方框作为匹配该范围的集合,。
  如[0-9] 则匹配0到9的数字范围

Lua 中的模式修饰符有四个:
+   匹配前一字符 1 次或多次,最长匹配
*   匹配前一字符 0 次或多次,最长匹配
-   匹配前一字符 0 次或多次,最短匹配
?   匹配前一字符 0 次或 1次
'+',匹配一个或多个字符,总是进行最长的匹配。
如,模式  '%a+'  匹配一个或多个字母或者一个单词:

注意以上的区别:

如:匹配c中的注释串
用 '/%*.*%*/'  和'/%*.-%*/'

str = "int x; /* x */  int y; /* y */"
print(string.gsub(str, "/%*.*%*/", "<注释串>"))
  --> int x; <注释串>
采用 '.-' 则为最短匹配,即匹配 "/*" 开始到第一个 "*/"  之前的部分:
str = "int x; /* x */  int y; /* y */"
print(string.gsub(str, "/%*.-%*/", "<注释部分>"))
  --> int x; <注释串>  int y; <注释串>

以 '^'  开头表示只匹配目标串的开始部分,
以 '$'  结尾表示只匹配目标串的结尾部分。

%b 表示匹配对称字符,注意其只能针对的ansi码单字符。
x = string.gsub("xdddddyxxx", "%bxy", "取代")
print(x)   -->取代xxx

如去除字符串首尾的空格:
function trim (s)
  return (string.gsub(s, "^%s*(.-)%s*$", "%1"))
end


---------------------------------

看原文中的gsub注释:相当详细,不过对于模式解释补充在上。

string.gsub (s, pattern, repl [, n])

Returns a copy of s in which all occurrences of the pattern
have been replaced by a replacement string specified by repl,
which may be a string, a table, or a function.
gsub also returns, as its second value, the total number of substitutions made.

repl是字符串,则为替换。 如果在参数前有%则表示符合匹配的字符串
If repl is a string, then its value is used for replacement.
The character % works as an escape character:
any sequence in repl of the form %n, with n between 1 and 9, stands for the
value of the n-th captured substring (see below).
The sequence %0 stands for the whole match. The sequence %% stands for a single %.


repl作为表参数
If repl is a table, then the table is queried for every match,
using the first capture as the key; if the pattern specifies
no captures, then the whole match is used as the key.

如果参数为函数,则每次匹配成功则调用该函数
If repl is a function, then this function is called every
time a match occurs, with all captured substrings passed
as arguments, in order;

if the pattern specifies no captures,
then the whole match is passed as a sole argument.

If the value returned by the table query or by the function call is a string or a number,
then it is used as the replacement string; otherwise, if it is false or nil,
then there is no replacement (that is, the original match is kept in the string).

参数n则限制最大
The optional last parameter n limits the maximum number of substitutions to occur.


举例:
   %1 表示符合模式的第一个匹配
   x = string.gsub("hello world", "(%w+)", "%1 %1")
   --> x="hello hello world world"
    
   第4项
   x = string.gsub("hello world", "%w+", "%0 %0", 1)
   --> x="hello hello world"
  
   hello 和from作为模式中左匹配为%1,world 和lua为右匹配,为%2
   x = string.gsub("hello world from Lua", "(%w+)%s*(%w+)", "%2 %1")
   --> x="world hello Lua from"

   替换 以$打头的字符串
   x = string.gsub("home = $HOME, user = $USER", "%$(%w+)", os.getenv)
   --> x="home = /home/roberto, user = roberto"
  
   参数为函数类型
   x = string.gsub("4+5 = $return 4+5$", "%$(.-)%$", function (s)
           return loadstring(s)()
         end)
     --> x="4+5 = 9"
    
    参数为表类型
   local t = {name="lua", version="5.1"}
   x = string.gsub("$name-$version.tar.gz", "%$(%w+)", t)
   --> x="lua-5.1.tar.gz"

==============================
gmatch 的用法:
在模式符合匹配多次时
Returns an iterator function that, each time it is called,
returns the next captures from pattern over string s.
If pattern specifies no captures, then the whole match
is produced in each call.

看例子:
   s = "hello world from Lua"
   for w in string.gmatch(s, "%a+") do
      print(w)
   end
 
采用gmatch来解析到表类型
     t = {}
     s = "from=world, to=Lua"
     for k, v in string.gmatch(s, "(%w+)=(%w+)") do
       t[k] = v
     end

一个http传送参数的应用
URL 编码,
这种编码将一些特殊字符(比  '=' '&' '+')转换为"%XX"形式的编码,
XX是字符的16进制表示,空白为'+'。
如,将"a+b = c"  编码为 "a%2Bb+%3D+c"
一个典型的参数串:
name=al&query=a%2Bb+%3D+c&q=yes+or+no

1先把空格和16进制编码转换为ansi码
function convet1(s)
  s = string.gsub(s, "+", " ")
  s = string.gsub(s, "%%(%x%x)", function (h)
   return string.char(tonumber(h, 16))
  end)
  return s
end

2.解析参数串
p = {}
function decode (s)
  for name, value in string.gmatch(s, "([^&=]+)=([^&=]+)") do
  name = unescape(name)
  value = unescape(value)
  p[name] = value
  end
end


posted @ 2008-10-15 22:12 kenlistian 阅读(54212) | 评论 (0)编辑 收藏

Lua 通过 table 提供了所有的协同函数,
create 函数创建一个新的协同程序,
create只有一个参数:
协同程序将要运行的代码封装而成的函数,返回值为thread类型的值。

通常情况下 create 的参数是一个匿名 
co = coroutine.create(function ()
       print("hello")
     end)

print(co)   --> thread: 0x8071d98

协同有三个状态:挂起态,运行态,停止态。

当创建协同程序时开始状态为挂起态,即创建后不会自动运行,
用status 函数检查协同的状态:

如:
print(coroutine.status(co))   --> suspended

挂起状态变为运行态:coroutine.resume

coroutine.resume(co)     --> hello

这个例子中,协同体打印出"hello"之后便进入终止状态:
print(coroutine.status(co))   --> dead

挂起函数yield 。将正在运行的代码挂起,

如下代码:
co = coroutine.create(function ()
    for i=1,10 do
      print("co", i)
      coroutine.yield()
    end
  end)
 
运行如下,将在第一个 yield 处被挂起:
coroutine.resume(co)     --> co   1
print(coroutine.status(co))   --> suspended
从协同的观点看:使用函数 yield 可以使程序挂起,当激活被挂起的程序时,
yield返回并继续程序的执行直到再次遇到 yield 或者程序结束 
coroutine.resume(co)   --> co   2
coroutine.resume(co)   --> co   3
...
coroutine.resume(co)   --> co   10
coroutine.resume(co)   -- prints nothing      


posted @ 2008-10-15 12:43 kenlistian 阅读(619) | 评论 (0)编辑 收藏

为何起用lua堆栈

当在Lua和C之间交换数据时我们面临着两个问题:
动态与静态类型系统的不匹配和自动与手动内存管理的不一致。

在Lua中,我们写下a[k]=v时,k和v可以有几种不同的类型(由于metatables的存在,a也可能有不同的类型)。

如果我们想在C中提供类似的操作,无论怎样,操作表的函数(settable)必定有一个固定的类型。
我们将需要几十个不同的函数来完成这一个的操作(三个参数的类型的每一种组合都需要一个函数)。

在C中声明一些union类型来解决这个问题,称之为lua_Value,它能够描述所有类型的Lua值。
,就可以这样声明settable
void lua_settable (lua_Value a, lua_Value k, lua_Value v);
这个解决方案有两个缺点。
1。要将如此复杂的类型映射到其它语言可能很困难;Lua不仅被设计为与C/C++易于交互,
  Java,Fortran以及类似的语言也一样。
2。Lua负责垃圾回收:如果将Lua值保存在C变量中,Lua引擎没有办法了解这种用法;
   它可能错误地认为某个值为垃圾并收集他。
       
Lua API没有定义任何类似lua_Value的类型。替代的方案,
它用一个抽象的栈在Lua与C之间交换值。
栈中的每一条记录都可以保存任何Lua值。

无论你何时想要从Lua请求一个值(比如一个全局变量的值),
1.将这个值压入栈,
2。调用Lua(这个值将被弹出)。

仍然需要一个不同的函数将每种C类型压入栈和一个不同函数从栈上取值(译注:只是取出不是弹出),
但是我们避免了组合式的爆炸(combinatorial explosion)。另外,因为栈是由Lua来管理的,
垃圾回收器知道那个值正在被C使用。几乎所有的API函数都用到了栈。

lua_pcall从栈上获取要被调用的函数并把任何临时的错误信息放在这里。
Lua以一个严格的LIFO规则(后进先出;也就是,始终存取栈顶)来操作栈。

当你调用Lua时,它只会改变栈顶部分。你的C代码却有更多的自由;更明确的来讲,
你可以查询栈上的任何元素,甚至是在任何一个位置插入和删除元素。
      
API有一系列压栈的函数,它将每种可以用C来描述的Lua类型压栈:
空值(nil)                                   用lua_pushnil,
数值型(doubele)                             用lua_pushnumber,
布尔型(在C中用整数表示)                     用lua_pushboolean,
任意的字符串(char*类型,允许包含'\0'字符)   用lua_pushlstring,
C语言风格(以'\0'结束)的字符串(const char*)用lua_pushstring:

void lua_pushnil (lua_State *L);
void lua_pushboolean (lua_State *L, int bool);
void lua_pushnumber (lua_State *L, double n);
void lua_pushlstring (lua_State *L, const char *s,size_t length);
void lua_pushstring (lua_State *L, const char *s);

同样也有将C函数和userdata值压入栈的函数,稍后会讨论到它们。
Lua中的字符串不是以零为结束符的;它们依赖于一个明确的长度,
因此可以包含任意的二进制数据。

将字符串压入串的正式函数是lua_pushlstring,它要求一个明确的长度作为参数。
对于以零结束的字符串,你可以用lua_pushstring(它用strlen来计算字符串长度)。

Lua是拷贝字符串而不是保持指向外部字符串(或任何其它对象,除了C函数——它总是静态指针)的指针。
对于它保持的所有字符串,Lua要么做一份内部的拷贝要么重新利用已经存在的字符串。

检测栈上是否有足够你需要的空间
int lua_checkstack (lua_State *L, int sz);


查询元素
  API用索引来访问栈中的元素。
 
  在栈中的第一个元素(也就是第一个被压入栈的)有索引1,下一个有索引2,以此类推。
  我们也可以用栈顶作为参照来存取元素,利用负索引。
  在这种情况下,-1指出栈顶元素(也就是最后被压入的),-2指出它的前一个元素,以此类推。
 
  如,调用lua_tostring(L, -1)以字符串的形式返回栈顶的值。
 
  在某些场合使用正索引访问栈较方便,另外一些情况下,使用负索引访问栈更方便。

API提供了一套lua_is*函数来检查一个元素是否是一个指定的类型,*可以是任何Lua类型。
因此有lua_isnumber,lua_isstring,lua_istable以及类似的函数。所有这些函数都有同样
的原型:

int lua_is... (lua_State *L, int index);
lua_isnumber和lua_isstring函数不检查这个值是否是指定的类型,而是看它是否能被转
换成指定的那种类型。例如,任何数字类型都满足lua_isstring。
还有一个lua_type函数,它返回栈中元素的类型。
(lua_is*中的有些函数实际上是用了这个函数定义的宏)

为了从栈中获得值,这里有lua_to*函数:
int lua_toboolean (lua_State *L, int index);
double lua_tonumber (lua_State *L, int index);
const char * lua_tostring (lua_State *L, int index);
size_t lua_strlen (lua_State *L, int index);
即使给定的元素的类型不正确,调用上面这些函数也没有什么问题。在这种情况下,
lua_toboolean、lua_tonumber和lua_strlen返回0,其他函数返回NULL。

由于ANSI C没有提供有效的可以用来判断错误发生数字值,所以返回的0是没有什么用处的。
对于其他函数而言,我们一般不需要使用对应的lua_is*函数:我们只需要调用lua_is*,
测试返回结果是否为NULL即可。

//返回的是一个指针,则需要另外找个地址拷贝值。。。。。
Lua_tostring函数返回一个指向字符串的内部拷贝的指针。你不能修改它(使你想起那里有一个const)。
只要这个指针对应的值还在栈内,Lua会保证这个指针一直有效。

当一个C函数返回后,Lua会清理他的栈,所以,有一个原则:永远不要将指向Lua字符串的指针
保存到访问他们的外部函数中。

Lua_string返回的字符串结尾总会有一个字符结束标志0,但是字符串中间也可能包含0,
lua_strlen返回字符串的实际长度。特殊情况下,假定栈顶的值是一个字符串,

下面的断言(assert)总是有效的:

//s是一个指向某个字符串地址的指针
const char *s = lua_tostring(L, -1); // any Lua string
size_t l = lua_strlen(L, -1);        // its length
assert(s[l] == '\0');
assert(strlen(s) <= l);


posted @ 2008-09-29 11:25 kenlistian 阅读(3130) | 评论 (0)编辑 收藏


posted @ 2008-06-27 12:27 kenlistian 阅读(340) | 评论 (0)编辑 收藏

把关于序列化的章节整理了下,大致了解了使用RMS类的方法。
至于如何在代码中实现,今个儿没时间搞。先放放。


MIDP2.0 规范里提供了RMS
以一种简单的,类似表格的形式组织信息,并存储起来形成持久化存储。

理解Records(记录)和 Records Stores(记录仓储)两个概念。

记录仓储(Records Stores)类似于数据库的表 table。
名称大小不能超过 32 个Unicode 字符,同一个Suite下的MIDlet 都可以共享这些记录仓储。

记录即表中记录。
记录(Record)由一整型的 RecordID 与一代表数据的 byte[]数组两个子元素组成。
RecordID 是记录的唯一标志符,就相当是数据表中递增的id关键字。

调用javax.microedition.rms即操作数据存储。
该包中有一主类, 四个接口,以及五个可能的被抛出异常。


打开

通过openRecordStore()来取得实例。

openRecordStore (String recordStoreName, boolean createIfNecessary)
openRecordStore (String recordStoreName, boolean createIfNecessary,int authmode), boolean writable))
openRecordStore (String recordStoreName, String vendorName, String suiteName)

第一个参数是记录仓储的名称,
第二个参数表明了当我们请求的仓储不存在时,是否新建一 Record Store;
第三个参数表明了此仓储的读取权限,
第四个参数则决定了写入权限。

当用第一个方法时, 则选择读取权限只限于本地,且拒绝其他MIDlet写数据到记录仓储上。
即相当于使用第二种开启方法并分别为第三第四个参数传入了RecordStore.AUTHMODE_PRIVATE 和 false。

第三openRecordStore 读取其他 MIDlet Suite 记录仓储。
传入参数为记录仓储名,发布商名以及 MIDlet Suite 套件名。


注意,如该储的读取权限为 AUTHMODE_PRIVATE 的话,此方法将返回安全错误。

用第一种方法的示例:
   private RecordStore rs = null;
   try {
     //打开一个RMS,如果打开失败,则创建
      rs = RecordStore.openRecordStore(“testRMS”, true);
    }
    catch (RecordStoreNotFoundException e) {
        e.printStackTrace();

    }
    catch (RecordStoreFullException e) {
        e.printStackTrace();
    }
    catch (RecordStoreException e) {
       e.printStackTrace();
   }


关闭 closeRecordStore()

打开需要关闭,就如同你new一个内存,要记得delete,不要指望自动回收功能。

try {
    rs = RecordStore.openRecordStore(“testRMS”, true);

       //.....
       rs.closeRecordStore();
    }
      catch (RecordStoreNotOpenException e) {
      e.printStackTrace();
    } catch (RecordStoreException e) {
      e.printStackTrace();
   }


删除deleteRecordStore()

在删除之前,确保当前的仓储是处于关闭状态,否则抛异常。
如下

//假定rs是已经存在的记录仓储,并已经打开
try
{
   rs.closeRecordStore();
   RecordStore.deleteRecordStore(“testRMS”);
   
}
catch (RecordStoreNotOpenException e) {
   e.printStackTrace();
    }
catch (RecordStoreNotFoundException e) {
    e.printStackTrace();
} catch (RecordStoreFullException e) {
    e.printStackTrace();
} catch (RecordStoreException e) {
     e.printStackTrace();
}


插入 addRecord(byte[] data, int offset, int numBytes)

添加byte数组类型的数据。
参数为byte[]数组,传入 byte[]数组起始位置,传入数据的长度

数据添加成功后, addRecord 将返回记录 ID号 (RecordID) ,

添加操作是一个原子操作。但在又读又写是同步的。


删除 deleteRecord(int recordId),

如试图从未开启的记录仓储中删除记录,返回RecordStoreNotOpenException异常;
如果传入ID无效的,返回 InvalidRecordIDException异常;

修改指定ID的记录值
    setRecord(int recordId, byte[] newData, int offset, int numBytes)


针对 RecordStore 的操作只提供对针对 byte 数组的服务.
遇到的都将是非 byte 类型。

采用流文件类来处理。

非byte-->byte
ByteArrayOutputStream,   
DataOutputStream,

byte-->非byte
ByteArrayInputStream,
DataInputStream


示例

首先写入一组自定义数据,然后在读出:
  ByteArrayOutputStream baos = new ByteArrayOutputStream();   //构建一个转换成byte字节的流
  DataOutputStream dos = new DataOutputStream(baos);           //构建写入流的数据类

  dos.writeBoolean(false);
  dos.writeInt(15);
  dos.writeUTF("abcde");

  byte [] data = baos.toByteArray();//取得byte数组
  dos.close();
  baos.close();

  
  ByteArrayInputStream bais = new ByteArrayInputStream(data); //构建一字节写入流
  DataInputStream dis = new DataInputStream(bais);           //能读流数据类
  
  boolean flag = dis.readBoolean();
  int intValue = dis.readInt();
  String strValue = dis.readUTF();
  dis.close();
  bais.close();
   

用RMS实现对象序列化
下面展示单词记录本,构建一个word类数据结构

public class Word {
  private String  enWord;   //英文单词
  private String  cnWord;   //解释
  private long   dateTime;   //读取时间
  private String  detail;    //备注信息
}

读出和写入调用serialize,deserialize
serialize 用于序列化对象数据,返回 byte 数组类型;
deserialize 完成的则是相反的工作。

/*
  生成序列化的byte数组数据
*/
  public byte[] serialize() throws IOException{
   
    ByteArrayOutputStream baos = new ByteArrayOutputStream();
    DataOutputStream dos = new DataOutputStream(baos);
   
    dos.writeUTF(this.enWord);
    dos.writeUTF(this.cnWord);
    dos.writeLong(this.dateTime);
    dos.writeUTF(this.detail);
   
    baos.close();
    dos.close();
    return baos.toByteArray();
}

/* 将传入的byte类型数据反序列化为已知数据结构
*/
  public static Word deserialize(byte[] data) throws IOException{
   
    ByteArrayInputStream bais = new ByteArrayInputStream(data);
    DataInputStream dis = new DataInputStream(bais);
   
    Word word = new Word();
    word.enWord = dis.readUTF();
    word.cnWord = dis.readUTF();
    word.dateTime = dis.readLong();
    word.detail = dis.readUTF();
   
   bais.close();
   dis.close();
   return word;

  }


RecordStore的更多操作


RecordComparator,
RecordEnumeration,
RecordFilter
RecordListener。

考虑到 RecordComparator、RecordFilter 都是作用在 RecordEnumeration 上的,我们先来介
绍这个接口。

RecordEnumeration遍历接口
采用for方式,由于RecordId所对应的记录并不见得存在,故采用RecordEnumeration 接口。
有点类似迭加器了。


enumerateRecords():
通过对 RecordStore 实例对象调用 enumerateRecords 方法来取得一个 RecordEnumeration 的
实例。
其可传入 3 个参数:filter,comparator与 keepUpdated。

前两个参数分别是过滤器和排序策略,
这个后面会讲到。

当传入的 filter不为空时,它将用于决定记录仓储中的哪些记录将被使用;
当 comparator 不为空时,RecordStore将按照我们指定的排列顺序返回。
第三个参数决定了当遍历器建立起来以后,是否对记录仓储新的改变做出回应。
如果传入 true,那么将有一个 RecordListener 被加入到 RecordStore 中,使得记录仓储的内容与
RecordEnumeration 随时保持同步。
如果传入 false,则可以使得当前遍历更有效率,但所取得的RecordID 集合仅仅是调用此方法这个时刻的RecordStore 快照。

此后对 RecordStore 所有更改都不会反应在这个集合上。
请读者根据要求在访问数据完整性和访问速度之间进行取舍。

numRecords():          返回了在当前遍历集合中,可用记录数目。这里所指的可用,不仅仅是说RecordID
                        对应的记录存在;当 filter存在时,也需要符合过滤条件。

hasNextElement():      判断在 RecordEnumeration 当前指向的下一个位置, 还有没有剩余记录了。

hasPreviousElement():  判断在 RecordEnumeration当前指向的前一个位置,还有没有剩余记录了。


nextRecord():             返回了遍历器下一位置的记录拷贝,由于返回的是拷贝,
                        所以任何对返回记录的修改都不会影响到记录仓储的实际内容。

nextRecordId():        返回当前遍历器下一位置记录的RecordID,当下一位置没有可用的记录时,
                        继续调用nextRecordId将抛出异常 InvalidRecordIDException。

添加一个方法 ViewAll(), 用来返回当前记录仓储中的所有单词
如何利用 RecordEnumeration 来遍历记录。

public Word[] viewAll() throws IOException {
    Word[] words = new Word[0];
    RecordEnumeration re = null;

    //rs是之前创建的RecordStore类型实例变量
    if (rs == null)
        return words;

    try {
       re = rs.enumerateRecords(null, new WordComparator(), false);
       //无过滤器、但有一个排序策略
      words = new Word[re.numRecords()];
      int wordRecords = 0;
   
      while (re.hasNextElement()) {
         byte[] tmp = re.nextRecord();
         words[wordRecords] = Word.deserialize(tmp);
         wordRecords++;
      }
    }
    catch (RecordStoreNotOpenException e1) {
       e1.printStackTrace();
    }
    catch (InvalidRecordIDException e1) {
       e1.printStackTrace();
    }
    catch (RecordStoreException e1) {
       e1.printStackTrace();
    }
    finally {
      if (re != null)
         re.destroy();
   }
   return words;
}

RecordFilter 过滤接口
  过滤接口是用来过滤不满足条件的记录的。
  要实现match(byte[] candidate)方法,当传入 byte 数据符合筛选条件时,返回 true。

  WordFilter 实现 RecordFilter 接口。

  public class WordFilter implements RecordFilter
  {
    private String  enWord;
    private int     type;
    public WordFilter(String enword, int type){
  
    //传入要比较的项,type指向一个自定义的内部事件标记
    //表现为整形
      this.enWord = enword;
      this.type   = type;
   }
   
   public boolean matches(byte[] word) {
   //matches方法中传入的参数是RMS中的各个候选值(元素)
   try {
   
       if(type == EventID.SEARCH_EQUAL){
            return Word.matchEN(word, enWord);
       }
       else{
         return Word.matchEN_StartWith(word, enWord);
       }
    }
    catch (IOException e) {
       e.printStackTrace();
       return false;
    }
   }
}

示例中的 EventID.SEARCH_EQUAL 为一个定义好的整型数据;
同时,这里涉及到了Word 类的两个对应方法:

public static boolean matchEN_StartWith(byte[] data, String enword) throws IOException
{
    ByteArrayInputStream bais = new ByteArrayInputStream(data);
    DataInputStream dis = new DataInputStream(bais);
    try{
         return (dis.readUTF().startsWith(enword));

     }catch(IOException e){
        e.printStackTrace();
        return false;
     }
}
  
public static boolean matchCN(byte[] data, String cnword) throws IOException
{
    ByteArrayInputStream bais = new ByteArrayInputStream(data);
    DataInputStream dis = new DataInputStream(bais);
    try{
         dis.readUTF();
         return (dis.readUTF().equals(cnword));
   }catch(IOException e){
       e.printStackTrace();
       return false;
   }
}


RecordComparator比较接口
   
   比较器定义了一个比较接口,用于比较两条记录是否匹配,或符合一定的逻辑关系。

   须实现compare方法
   compare(byte[] rec1,  byte[] rec2)
   当rec1 在次序上领先于rec2 时,返回RecordComparator.PRECEDES;
   反之则返回RecordComparator.FOLLOWS;
   参数相等,返回RecordComparator.EQUIVALENT。

   private static class WordComparator implements RecordComparator{
     
      public int compare(byte[] word_1, byte[] word_2) {
   
     try {
        Word word1 = Word.deserialize(word_1);
        Word word2 = Word.deserialize(word_2);
        long dateTime1 = word1.getDateTime();
        long dateTime2 = word2.getDateTime();
     
        if(dateTime1 < dateTime2){
           return RecordComparator.FOLLOWS;
         }
   
    if(dateTime1 > dateTime2){
          return RecordComparator.PRECEDES;
        }
        return RecordComparator.EQUIVALENT;
     }
     catch (IOException e)
     {
        e.printStackTrace();
      }
      return 0;
    }
}


RecordListener 监听器接口

RecordListener是用于接受监听记录仓储中记录添加,更改或删除记录等事件的接口。
利用 RecordStore 的addRecordListener 方法来注册一个监听器。
使用监听器必须实现 3 个方法:
recordAdded,
recordChanged
recordDeleted,

都需传入两个参数:记录仓储名称 recordStroe 与记录号recordId。

  recordAdded:当一条新的记录被添加到仓储空间的时候,该方法被触发。
  recordChanged:当一条记录被修改时使用。
  recordDeleted:当一条记录从记录仓储中删除时调用。

注意,RecordListener 是在对记录仓储的操作动作完成以后被调用的!
特别在recordDeleted 方法中,由于传入的记录已经删除,如再使用
getRecord()试图取得刚刚被删除记录的话,会抛出 InvalidRecordIDException 异常。


  getLastModified():   返回记录仓储最后更新时间。
  getName():           返回一个已经打开了的记录仓储名称。
  getNumRecords():     返回当前仓储中记录总数。
  getSizeAvailable():  返回当前仓储中可用的字节数。
  getVersion():        返回记录仓储版本号。
  listRecordStores():  获取该MIDlet套件中所有的记录仓储列表。
posted @ 2008-06-24 22:27 kenlistian 阅读(345) | 评论 (0)编辑 收藏


  依旧是拿例子来学习,再翻一翻讲解,就大致了解一个程序的架构。

在用Canvas写手机界面,其实不过就是自画图而已,在wtk中有个minicolor的例子,
用的是canvas类,其中也讲解了相关的知识点。
这里罗列下几个知识点:

调用repaint()产生重绘事件。

底层事件分为三类:
 Press Events  按键事件
 Action Keys   动作按键
 PointerEvents 触控事件
 
按键事件
keyPressed()   
keyReleased()
keyRepeated()

  在RepeatEvents 不是 JTWI 要求强制支持的,故需调用hasRepeatEvents判定。

   当按下按键都会触发 keyPressed()函数,并传入相应位置的整数值,
   有KEY_NUM0- KEY_NUM9 十个常数分别代表键盘上的 0-9,及其两个功能键,
   KEY_STAR,KEY_POUND, 若传入的值小于 0,则为不合法的 keycode
 
 动作按键主要针对游戏来设计的,
 有如下:
  UP,DOWN,LEFT,RIGHT,
  GAME_A,GAME_B,GAME_C,GAME_D,
  当按下这些按键时会映射到为每个按键事件编写的方法,来完成一些动作。
  在MIDP2.0里已有游戏开发包了可供学习。
 
触控事件主要面向高端设备,并非 JTWI 要求强制支持的,

pointerPressed(),
pointerReleased(),
pointerDragged(),

对应移动设备手写笔的点,击,拖拽几个动作。参考 WTK的说明文档


在运行minicolor demo,老方法,创建该工程文件,及其同名类。(可以自命名)
注意一点的是:
在wtk中,无法直接调用canvas类,而需要一个midlet外包类来调用canvas类创建,
其方法也不过一个midlet框架,在其startApp()中调用Canvas实例类。
框架代码如下:
  import   javax.microedition.midlet.*;  
  
import   javax.microedition.lcdui.*;  
   
  
public   class   testCanvas extends MIDlet{  

  
private   Display   display;  

  
public   testCanvas()
  {  
     display
=Display.getDisplay(this);  
  }  

  
public   void   startApp()
 { 
     //这里调用canvas实例类,在独立一个同目录minicolorchooser.java文件。
     MiniColorChooser testCanvas 
= new MiniColorChooser();
     display.setCurrent(testCanvas);
  }
  
  
public   void   pauseApp(){  
   
  }  
  
public   void   destroyApp(boolean   unconditional){                                                        
  }  

  }

其中MiniColorChooser.java文件代码如下,加了注释,

import javax.microedition.lcdui.*;

/**
  一个设置手机背景颜色的Canvas实现类
 
*/
public class MiniColorChooser extends Canvas {

    
/** 条状宽度 */
    
static final int BORDER = 2;

    
/** 颜色条高度 */
    
static final int BAR_H = 14;  


int rgbColor;   
    
int ndx = 0;

    
public MiniColorChooser() {
        setColor(
0xffff00);
    }
    
    
public void setColor(int RGB) {
        rgbColor 
= RGB & 0x00ffffff;
    }

    
/**
      颜色值是这样格式:  0x00RRGGBB
     
*/
    
public int getColor() {
        
return rgbColor;
    }

    
//画背景,修改界面全在这里
    protected void paint(Graphics g) {
        
int w = getWidth();
        
int h = getHeight();

        
int sample_w = w - 1;
        
int sample_h = h - ((BAR_H + BORDER) * 3);      //界面高- 3* 条状颜色栏
        int sample_y = BORDER;

        
//调颜色栏的蓝,绿,红的y坐标位置
        int b_y = sample_y + sample_h + (BORDER * 2);
        
int g_y = b_y + BAR_H;
        
int r_y = g_y + BAR_H;

        
//先把界面涂为黑板色
        g.setColor(0x000000);          
        g.fillRect(
00, w, h);

        
//再画调色板区域。x0=2,y0=2, x1=背景宽, y1=sample_h
        g.setColor(rgbColor);
        g.fillRect(BORDER, sample_y, sample_w, sample_h);

        
//画颜色调节栏 ,先蓝色
        int blue = (rgbColor >> 0& 0xff;
        g.setColor(
00255);
        g.fillRect(
20, b_y, blue / 410);

        
//绿
        int green = (rgbColor >> 8& 0xff;
        g.setColor(
02550);
        g.fillRect(
20, g_y, green / 410);

        
int red = (rgbColor >> 16& 0xff;
        g.setColor(
25500);
        g.fillRect(
20, r_y, red / 410);

        
//写blue ,green ,red 颜色数值
        g.setColor(255255255);
        g.drawString(Integer.toString(blue), 
18, b_y - 3, Graphics.RIGHT | Graphics.TOP);
        g.drawString(Integer.toString(green), 
18, g_y - 3, Graphics.RIGHT | Graphics.TOP);
        g.drawString(Integer.toString(red), 
18, r_y - 3, Graphics.RIGHT | Graphics.TOP);

        
//画调节颜色栏边框,注意,画边框,
        
//ndx = 0,1,2,则分别对应当前激活的调节栏。
        if (ndx >= 0) {
            
int y = b_y + (ndx * BAR_H);
            g.drawRect(
20, y, 6310);
        }
    }

    
//当按键不松时
    public void keyRepeated(int key) 
    {
        keyPressed(key);
    }

    
/**
      按键事件
     
*/
    
protected void keyPressed(int key) {
        
int action = getGameAction(key);
        
int dir = 0;

        
switch (action) {
        
case RIGHT:   //改变颜色值
            dir += 1;
            
break;

        
case LEFT:
            dir 
-= 1;
            
break;

        
case UP:
            ndx 
-= 1;
            
break;

        
case DOWN:
            ndx 
+= 1;
            
break;

        
default:
            
return
        }


// ndx =0,1,2 表示蓝,绿,红三个颜色条件栏
        
// 一个颜色 0xff ff ff, 其第一个ff表示红,2表示绿,3表示蓝,
        
// 通过 >> 方式获取 对应颜色
        if (ndx < 0) {
            ndx 
= 0;
        }
        
else
        
if (ndx > 2) {
            ndx 
= 2;
        }
        
else
        
if (ndx >= 0) {
            
//取出对于颜色值,改变
            int v = (rgbColor >> (ndx * 8)) & 0xff;
            v 
+= (dir * 0x20);        //颜色呈8次递进变化。

            
if (v < 0) {
                v 
= 0;
            }

            
if (v > 255) {
                v 
= 255;
            }

            
int mask = 0xff << (ndx * 8);
            
//将改变的颜色值 加到对应位。
            rgbColor = (rgbColor & ~mask) | (v << (ndx * 8));
        }

        
//立即重画
        repaint();
    }
}


运行效果如下,


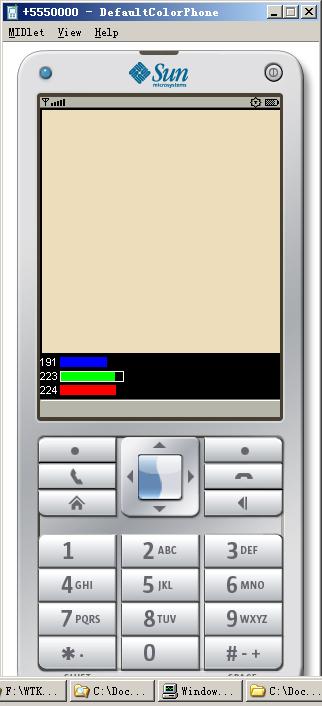
在学习中,看别人的代码细节不是很清楚,如果运行一下,就能理解代码是做什么了。
看来有时看代码,得动手多过几遍。


posted @ 2008-06-23 21:36 kenlistian 阅读(689) | 评论 (0)编辑 收藏

继续学习j2me的ui编程,下面是实现ticker的例子,运行就是这样子:


/*
一个简单的提示现实类,在每个窗体中只允许有一个该类的实例。
如下的例子。
其代码如同以前加载工程中一样,运行它,测试界面如下:

*/

import javax.microedition.lcdui.*;
import javax.microedition.lcdui.Command;
import javax.microedition.lcdui.CommandListener;
import javax.microedition.lcdui.Display;
import javax.microedition.lcdui.Displayable;
import javax.microedition.midlet.MIDlet;

public class tickerdemo1 extends MIDlet implements CommandListener {

    
private static final String TICKER_TEXT =
        
"类似走马灯,又类似提示器。。。 " + "运行下看看。。。" ;

    
private boolean firstTime;
    
private Form mainForm;
    
private Command exitCommand = new Command("Exit", Command.EXIT, 1);
    
private Display myDisplay;
    
private Ticker t;

    
public tickerdemo1() {
        myDisplay 
= Display.getDisplay(this);
        firstTime 
= true;
        mainForm 
= new Form("新窗体");
        mainForm.setCommandListener(
this);
    }

    
protected void startApp() {
        
if (firstTime) {
            t 
= new Ticker(TICKER_TEXT);   //创建实例
            mainForm.setTicker(t);
            firstTime 
= false;
        }

        mainForm.addCommand(exitCommand);
        myDisplay.setCurrent(mainForm);
    }

    
protected void destroyApp(boolean unconditional) {
        myDisplay.setCurrent((Displayable)
null);
        notifyDestroyed();
    }

    
protected void pauseApp() {
    }

    
public void commandAction(Command c, Displayable s) {
        
if (c == exitCommand) {
            destroyApp(
true);
        }
    }
}

posted @ 2008-06-22 12:00 kenlistian 阅读(907) | 评论 (0)编辑 收藏


一个list 例子来看,demo 中的例子,

打开toolkid2.52中,创建listDemo工程文件,然后创建listDeom类,
把下面代码贴在src下面的新建立的listdemo.java文件名中,在toolkid
中build,run,可以看到实际运行结果。

说明下:
1.import 导入lcdui 类包。这是一个界面包。
2.Display 类,display 实例,通过setCurrent切换到当前界面。
3.commandAction函数,处理相应按钮事件。


************************************************************

import javax.microedition.lcdui.*;
import javax.microedition.midlet.MIDlet;

public class ListDemo extends MIDlet implements CommandListener {

    
private static final Command CMD_EXIT = new Command("退出", Command.EXIT, 1);
    
private static final Command CMD_BACK = new Command("返回", Command.BACK, 1);

    
private Display display;         
    
private List mainList;
    
private List exclusiveList;
    
private List implicitList;
    
private List multipleList;
    
private boolean firstTime;

    
public ListDemo() {

        display 
= Display.getDisplay(this);

        String[] stringArray 
= { "Option A""Option B""Option C""Option D" };
        Image[] imageArray 
= null;

        
//创建单选list 界面,包括退出按钮和返回按钮及其事件
        exclusiveList = new List("单选", Choice.EXCLUSIVE, stringArray, imageArray);
        exclusiveList.addCommand(CMD_BACK);
        exclusiveList.addCommand(CMD_EXIT);
        exclusiveList.setCommandListener(
this);
       
        
//
        implicitList = new List("简单", Choice.IMPLICIT, stringArray, imageArray);
        implicitList.addCommand(CMD_BACK);
        implicitList.addCommand(CMD_EXIT);
        implicitList.setCommandListener(
this);

        
//多选list
        multipleList = new List("多选", Choice.MULTIPLE, stringArray, imageArray);
        multipleList.addCommand(CMD_BACK);
        multipleList.addCommand(CMD_EXIT);
        multipleList.setCommandListener(
this);

        firstTime 
= true;
    }

    
protected void startApp() {
       
        
if (firstTime) {
            Image[] imageArray 
= null;

            
try {
                
// 加载icon,位置在res下相对目录
                Image icon = Image.createImage("/midp/uidemo/Icon.png");
                imageArray 
= new Image[] { icon, icon, icon };
            } 
catch (java.io.IOException err) {

            }

            String[] stringArray 
= { "单选""简单""多选" };

            
//创建界面
            mainList = new List("Choose type", Choice.IMPLICIT, stringArray, imageArray);
            mainList.addCommand(CMD_EXIT);
            mainList.setCommandListener(
this);

            
//设置界面为当前为mainList
            display.setCurrent(mainList);
            firstTime 
= false;
        }
    }

    
protected void destroyApp(boolean unconditional) {
    }

    
protected void pauseApp() {
    }

    
//处理按钮事件
    public void commandAction(Command c, Displayable d) {

        
if (d.equals(mainList)) {  //当前界面为mainlist

            
if (c == List.SELECT_COMMAND) { //
                if (d.equals(mainList)) {
                    
//置换界面
                    switch (((List)d).getSelectedIndex())
                    {
                    
case 0:
                        display.setCurrent(exclusiveList);
                        
break;
                    
case 1:
                        display.setCurrent(implicitList);
                        
break;
                    
case 2:
                        display.setCurrent(multipleList);
                        
break;
                    }
                }
            }
        } 
else {
            
//在子界面,按钮为CMD_BACK,返回主list界面
            if (c == CMD_BACK) {
                display.setCurrent(mainList);
            }
        }

        
if (c == CMD_EXIT) {
            destroyApp(
false);
            notifyDestroyed();
        }
    }
}


posted @ 2008-06-21 23:13 kenlistian 阅读(628) | 评论 (0)编辑 收藏

开发手机软件步骤
----------------

步骤

1  编写
2  编译
3  混淆 (可选)
4  预审核
5  打包   生产jar,同时需编写 jad后缀的描述文件。
6. 发布   将jar ,jad传输到手机。


再细致的描述如下:
-----------------------------------------------------------------------------------------------------
流程          工具                       输入                           输出
编译       javac.exe 编译           源文件(*.java)                   未混淆的类文件(*.class)
混淆       第三方提供的工具         未混淆的类文件(*.class)          混淆后的类文件(*.class)
预审       preverify.exe            预审核,混淆后的类文件(*.class)   经过预先审核的类文件(*.class)
打包       jar.exe                  经过预先审核的类文件(*.class)    包文件(*.jar)

编写
描述       文本编辑工具                                               描述文件(*.jad)  
文件
                  
安装       传输工具               包文件(*.jar),描述文件(*.jad)
        (IR/BT/数据线/OTA)  

运行                                                                   在仿真器或手机上正式运行
-----------------------------------------------------------------------------------------------------


编译,混淆就不讲了。

混淆工具可以到如下下载:(不知道能不能下载得到)

JODE        http://jode.sourceforge.net/      开源
ProGuard    http://proguard.sourceforge.net/  开源
RetroGuard  http://www.retrologic.com/        开源,中国移动百宝箱强制使用
DashO       http://www.preemptive.com/        商业软件
ZKM         http://www.zelix.com/             商业软件
JBuilder     http://www.borland.com/          集成开发环境中内附混淆功能


预审核
 
   class 在传输过程中容易损坏或是被篡改,传统的Java 程序在运行前在本地机器上对.class
进行 Byte Code的审核。而对于手机这样的资源有限设备而言,在手机上进行此类的审核是浪费
资源的(如占用 CPU 的时间、消耗电力等) 。故须先在PC 机上使用 preverify.exe进行一部
份预选审核工作。这样在手机上进行的审核工作就减少了。

打包也不需要赘叙。

安装
1  数据线,将 PC 与手机相连,下载文件 jar和jad
2  使用红外线
3  使用蓝牙
4  使用 OTA空中下载(利用短信/WAP)

posted @ 2008-06-19 13:44 kenlistian 阅读(287) | 评论 (0)编辑 收藏


  说百遍不如做一遍

  -------------------------------


  WTK  的全称是Sun J2ME Wireless Toolkit  —— Sun的无线开发工具包。

  该工具箱包含了完整的生成工具、实用程序以及设备仿真器。

  所了解的版本,以及对应可以开发的程序。


1.0.4 版只能够开发 MIDP1.0  应用程序。

2.0   版只能够开发 MIDP2.0  应用程序。 

2.1   版则可开发 MIDP1.0、  JTWI(CLDC 1.0, MIDP2.0, WMA1.1)可改用 CLDC1.1或加入 MMAPI1.1),

      自定义(自己随机组合 Configuration, Profile以及 Optional Package)三种环境下的应用程序。


2.2   版, WTK全面的支持JTWI规范。即MIDP 2.0, CLDC 1.1, WMA 2.0, MMAPI 1.1,

      Web Services (JSR 172), File and PIM APIs (JSR 75), Bluetooth and OBEX APIs (JSR 82), and

      3D Graphics (JSR 184);

       也可用该版本开发面向 CLDC1.0  和 MIDP1.0 的应用程序。


 现在都2.5了。估计支持以上。


 sun 的官方网站   下载链接:http://java.sun.com


安装完,有以下几个目录:


   apps--- demo

   bin --- 开发工具目录

   docs ---help

   lib --- 库文件

   sessions --性能监控保存信息

   wtklib----模拟器及其工具

   j2mewtk_template ??


1.run toolkit


2.create 一个简单的程序。


3.new project

  在创建工程文件名中命名工程名。如hello

4.设置平台架构


以最简单的MIDP1.0为架构。

点击ok,将在默认的目录中创建一个hello程序框架。


一般在本机的C:\Documents and Settings\Administrator\j2mewtk\2.5.2\apps\hello\


5.到该目录中的src中,创建和工程名同名的hello.java程序,粘贴下面的程序框架:


import javax.microedition.lcdui.*;

import javax.microedition.midlet.MIDlet;

public class hello extends MIDlet {


    Display display;


    public hello() {

        super();

        display = Display.getDisplay(this);

    }


    protected void startApp(){

        Form form = new Form("Hello!");

        form.append("welcome!");

        display.setCurrent(form);

    }


    protected void pauseApp() { 

    }


    protected void destroyApp(boolean arg0){           

    }

}


6.回到wtk,builder,然后run。将模拟器出来,即可看到

 一个简单的程序出来了。


posted @ 2008-06-18 21:24 kenlistian 阅读(375) | 评论 (0)编辑 收藏

仅列出标题
共42页: First 28 29 30 31 32 33 34 35 36 Last