To get started, first launch Eclipse and create a new Android project. Name the project as shown in Figure 1.
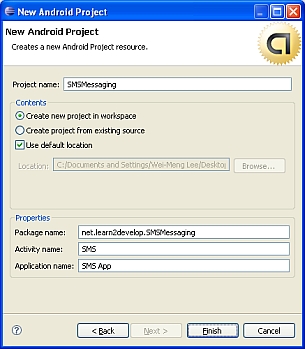
Figure 1 Creating a new Android project using Eclipse
Android uses a permission-based policy where all the permissions needed by an application need to be specified in the AndroidManifest.xml file. By doing so, when the application is installed it will be clear to the user what specific access permissions are required by the application. For example, as sending SMS messages will potentially incur additional cost on the user's end, indicating the SMS permissions in theAndroidManifest.xml file will let the user decide whether to allow the application to install or not.
In the AndroidManifest.xml file, add the two permissions - SEND_SMS and RECEIVE_SMS:
<?xml version="1.0" encoding="utf-8"?> <manifest xmlns:android="http://schemas.android.com/apk/res/android" package="net.learn2develop.SMSMessaging" android:versionCode="1" android:versionName="1.0.0"> <application android:icon="@drawable/icon" android:label="@string/app_name"> <activity android:name=".SMS" android:label="@string/app_name"> <intent-filter> <action android:name="android.intent.action.MAIN" /> <category android:name="android.intent.category.LAUNCHER" /> </intent-filter> </activity> </application> <uses-permission android:name="android.permission.SEND_SMS"> </uses-permission> <uses-permission android:name="android.permission.RECEIVE_SMS"> </uses-permission> </manifest>
In the main.xml file located in the res/layout folder, add the following code so that the user can enter a phone number as well as a message to send:
<?xml version="1.0" encoding="utf-8"?> <LinearLayout xmlns:android="http://schemas.android.com/apk/res/android" android:orientation="vertical" android:layout_width="fill_parent" android:layout_height="fill_parent" > <TextView android:layout_width="fill_parent" android:layout_height="wrap_content" android:text="Enter the phone number of recipient" /> <EditText android:id="@+id/txtPhoneNo" android:layout_width="fill_parent" android:layout_height="wrap_content" /> <TextView android:layout_width="fill_parent" android:layout_height="wrap_content" android:text="Message" /> <EditText android:id="@+id/txtMessage" android:layout_width="fill_parent" android:layout_height="150px" android:gravity="top" /> <Button android:id="@+id/btnSendSMS" android:layout_width="fill_parent" android:layout_height="wrap_content" android:text="Send SMS" /> </LinearLayout>
The above code creates the UI shown in Figure 2.

Figure 2 Creating the UI for sending SMS messages
Next, in the SMS activity, we wire up the Button view so that when the user clicks on it, we will check to see that the phone number of the recipient and the message is entered before we send the message using the sendSMS() function, which we will define shortly:
package net.learn2develop.SMSMessaging; import android.app.Activity; import android.app.PendingIntent; import android.content.Intent; import android.os.Bundle; import android.telephony.gsm.SmsManager; import android.view.View; import android.widget.Button; import android.widget.EditText; import android.widget.Toast; public class SMS extends Activity { Button btnSendSMS; EditText txtPhoneNo; EditText txtMessage; /** Called when the activity is first created. */ @Override public void onCreate(Bundle savedInstanceState) { super.onCreate(savedInstanceState); setContentView(R.layout.main); btnSendSMS = (Button) findViewById(R.id.btnSendSMS); txtPhoneNo = (EditText) findViewById(R.id.txtPhoneNo); txtMessage = (EditText) findViewById(R.id.txtMessage); btnSendSMS.setOnClickListener(new View.OnClickListener() { public void onClick(View v) { String phoneNo = txtPhoneNo.getText().toString(); String message = txtMessage.getText().toString(); if (phoneNo.length()>0 && message.length()>0) sendSMS(phoneNo, message); else Toast.makeText(getBaseContext(), "Please enter both phone number and message.", Toast.LENGTH_SHORT).show(); } }); } }The sendSMS() function is defined as follows:
public class SMS extends Activity { //... /** Called when the activity is first created. */ @Override public void onCreate(Bundle savedInstanceState) { //... } //---sends an SMS message to another device--- private void sendSMS(String phoneNumber, String message) { PendingIntent pi = PendingIntent.getActivity(this, 0, new Intent(this, SMS.class), 0); SmsManager sms = SmsManager.getDefault(); sms.sendTextMessage(phoneNumber, null, message, pi, null); } }To send an SMS message, you use the SmsManager class. Unlike other classes, you do not directly instantiate this class; instead you will call thegetDefault() static method to obtain an SmsManager object. The sendTextMessage() method sends the SMS message with a PendingIntent. ThePendingIntent object is used to identify a target to invoke at a later time. For example, after sending the message, you can use a PendingIntentobject to display another activity. In this case, the PendingIntent object (pi) is simply pointing to the same activity (SMS.java), so when the SMS is sent, nothing will happen.
If you need to monitor the status of the SMS message sending process, you can actually use two PendingIntent objects together with twoBroadcastReceiver objects, like this:
//---sends an SMS message to another device--- private void sendSMS(String phoneNumber, String message) { String SENT = "SMS_SENT"; String DELIVERED = "SMS_DELIVERED"; PendingIntent sentPI = PendingIntent.getBroadcast(this, 0, new Intent(SENT), 0); PendingIntent deliveredPI = PendingIntent.getBroadcast(this, 0, new Intent(DELIVERED), 0); //---when the SMS has been sent--- registerReceiver(new BroadcastReceiver(){ @Override public void onReceive(Context arg0, Intent arg1) { switch (getResultCode()) { case Activity.RESULT_OK: Toast.makeText(getBaseContext(), "SMS sent", Toast.LENGTH_SHORT).show(); break; case SmsManager.RESULT_ERROR_GENERIC_FAILURE: Toast.makeText(getBaseContext(), "Generic failure", Toast.LENGTH_SHORT).show(); break; case SmsManager.RESULT_ERROR_NO_SERVICE: Toast.makeText(getBaseContext(), "No service", Toast.LENGTH_SHORT).show(); break; case SmsManager.RESULT_ERROR_NULL_PDU: Toast.makeText(getBaseContext(), "Null PDU", Toast.LENGTH_SHORT).show(); break; case SmsManager.RESULT_ERROR_RADIO_OFF: Toast.makeText(getBaseContext(), "Radio off", Toast.LENGTH_SHORT).show(); break; } } }, new IntentFilter(SENT)); //---when the SMS has been delivered--- registerReceiver(new BroadcastReceiver(){ @Override public void onReceive(Context arg0, Intent arg1) { switch (getResultCode()) { case Activity.RESULT_OK: Toast.makeText(getBaseContext(), "SMS delivered", Toast.LENGTH_SHORT).show(); break; case Activity.RESULT_CANCELED: Toast.makeText(getBaseContext(), "SMS not delivered", Toast.LENGTH_SHORT).show(); break; } } }, new IntentFilter(DELIVERED)); SmsManager sms = SmsManager.getDefault(); sms.sendTextMessage(phoneNumber, null, message, sentPI, deliveredPI); }The above code uses a PendingIntent object (sentPI) to monitor the sending process. When an SMS message is sent, the firstBroadcastReceiver's onReceive event will fire. This is where you check the status of the sending process. The second PendingIntent object (deliveredPI) monitors the delivery process. The second BroadcastReceiver's onReceive event will fire when an SMS is successfully delivered.
You can now test the application by pressing F11 in Eclipse. To send an SMS message from one emulator instance to another, simply launch another instance of the Android emulator by going to the Tools folder of the SDK and running Emulator.exe.
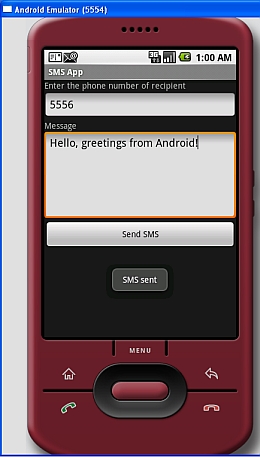
Figure 3 Sending an SMS message
Figure 3 shows how you can send an SMS message from one emulator to another; simply use the target emulator's port number (shown in the top left corner of the window) as its phone number. When an SMS is sent successfully, it will display a "SMS sent" message. When it is successfully delivered, it will display a "SMS delivered" message. Note that for testing using the emulator, when an SMS is successfully delivered, the "SMS delivered" message does not appear; this only works for real devices.
Figure 4 shows the SMS message received on the recipient emulator. The message first appeared in the notification bar (top of the screen). Dragging down the notification bar reveals the message received. To view the entire message, click on the message.
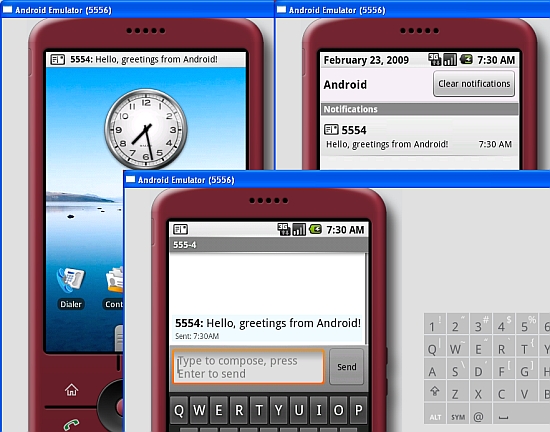
Figure 4 The SMS message received by the Android emulator
If you do not want to go through all the trouble of sending the SMS message yourself, you can use an Intent object to help you send an SMS message. The following code shows how you can invoke the built-in SMS application to help you send an SMS message:
Intent sendIntent = new Intent(Intent.ACTION_VIEW); sendIntent.putExtra("sms_body", "Content of the SMS goes here..."); sendIntent.setType("vnd.android-dir/mms-sms"); startActivity(sendIntent);Figure 5 shows the built-in SMS application invoked to send the SMS message.
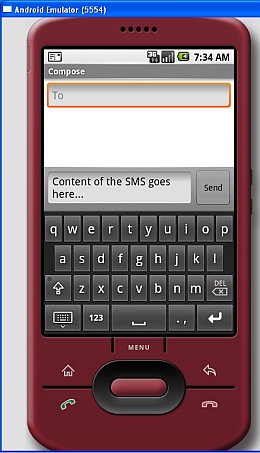
Figure 5 Invoking the built-in SMS application
Receiving SMS Messages
Besides programmatically sending SMS messages, you can also intercept incoming SMS messages using a BroadcastReceiver object.
To see how to receive SMS messages from within your Android application, in the AndroidManifest.xml file add the <receiver> element so that incoming SMS messages can be intercepted by the SmsReceiver class:
<?xml version="1.0" encoding="utf-8"?> <manifest xmlns:android="http://schemas.android.com/apk/res/android" package="net.learn2develop.SMSMessaging" android:versionCode="1" android:versionName="1.0.0"> <application android:icon="@drawable/icon" android:label="@string/app_name"> <activity android:name=".SMS" android:label="@string/app_name"> <intent-filter> <action android:name="android.intent.action.MAIN" /> <category android:name="android.intent.category.LAUNCHER" /> </intent-filter> </activity> <receiver android:name=".SmsReceiver"> <intent-filter> <action android:name= "android.provider.Telephony.SMS_RECEIVED" /> </intent-filter> </receiver> </application> <uses-permission android:name="android.permission.SEND_SMS"> </uses-permission> <uses-permission android:name="android.permission.RECEIVE_SMS"> </uses-permission> </manifest>
Add a new class file to your project and name it as SmsReceiver.java (see Figure 6).
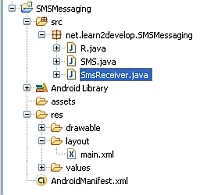
Figure 6Adding the SmsReceiver.java file to the project
In the SmsReceiver class, extend the BroadcastReceiver class and override the onReceive() method:
package net.learn2develop.SMSMessaging; import android.content.BroadcastReceiver; import android.content.Context; import android.content.Intent; public class SmsReceiver extends BroadcastReceiver { @Override public void onReceive(Context context, Intent intent) { } }When SMS messages are received, the onCreate() method will be invoked. The SMS message is contained and attached to the Intent object (intent - the second parameter in the onReceive() method) via a Bundle object. The messages are stored in an Object array in the PDU format. To extract each message, you use the static createFromPdu() method from the SmsMessage class. The SMS message is then displayed using theToast class:
package net.learn2develop.SMSMessaging; import android.content.BroadcastReceiver; import android.content.Context; import android.content.Intent; import android.os.Bundle; import android.telephony.gsm.SmsMessage; import android.widget.Toast; public class SmsReceiver extends BroadcastReceiver { @Override public void onReceive(Context context, Intent intent) { //---get the SMS message passed in--- Bundle bundle = intent.getExtras(); SmsMessage[] msgs = null; String str = ""; if (bundle != null) { //---retrieve the SMS message received--- Object[] pdus = (Object[]) bundle.get("pdus"); msgs = new SmsMessage[pdus.length]; for (int i=0; i<msgs.length; i++){ msgs[i] = SmsMessage.createFromPdu((byte[])pdus[i]); str += "SMS from " + msgs[i].getOriginatingAddress(); str += " :"; str += msgs[i].getMessageBody().toString(); str += "\n"; } //---display the new SMS message--- Toast.makeText(context, str, Toast.LENGTH_SHORT).show(); } } }That's it! To test the application, press F11 in Eclipse. Deploy the application to each Android emulator. Figure 7 shows Eclipse showing the emulators currently running. All you need to do is to select each emulator and deploy the application onto each one.
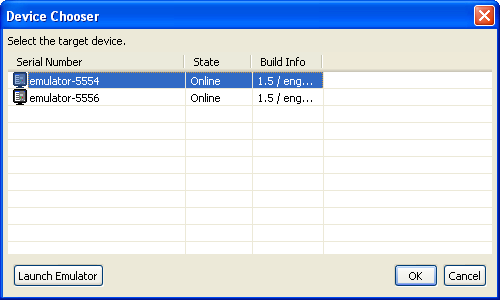
Figure 7 Selecting an emulator/device to deploy the application onto
Figure 8 shows that when you send an SMS message to another emulator instance (port number 5556), the message is received by the target emulator and displayed via the Toast class.

Figure 8 Sending and receiving SMS messages using the Android emulators
Summary
In this article, you have seen how you can send and receive SMS messages programmatically from within your Android application. The capability to send and receive SMS messages is very useful as you can build very compelling applications. As an example, you can build a location tracker application where you can send a secret-coded SMS message to a device and when the device receives the secret SMS message it will reply with another SMS message containing its current geographical location using its built-in GPS receiver. How cool is that?!
posted on 2012-06-12 17:38
汪杰 阅读(428)
评论(0) 编辑 收藏 引用 所属分类:
Java