Appium介绍
Appium是一个开源、跨平台的测试框架,可以用来测试原生及混合的移动端应用。Appium支持iOS、Android及FirefoxOS平台。Appium使用WebDriver的json wire协议,来驱动Apple系统的UIAutomation库、Android系统的UIAutomator框架。Appium对iOS系统的支持得益于Dan Cuellar’s对于iOS自动化的研究。Appium也集成了Selendroid,来支持老Android版本。

Appium进行自动化测试的两个好处
(1) Appium在不同平台中使用了标准的自动化APIs,所以在跨平台时,不需要重新编译或者修改自己的应用。这里,跨平台的意思是指可以在不同的系统上用相同的方式编写测试脚本,而不是指用于Android系统的测试脚本可以完全不用修改的应用于iOS系统上。事实上,Android和IOS应用几乎需要独立的进行编写。
(2)Appium支持Selenium WebDriver支持的所有语言,如java、Object-C、JavaScript、PHP、Python、Ruby、C#、Clojure,或者Perl语言,更可以使用Selenium WebDriver的Api。Appium支持任何一种测试框架。如果只使用Apple的UIAutomation,我们只能用javascript来编写测试用例,而且只能用Instruction来运行测试用例。同样,如果只使用Google的UIAutomation,我们就只能用java来编写测试用例。

Appium的系统需求
Android自动化测试可以在Windows、Mac、Linux上进行,需要安装Android SDK、Node等工具。而iOS的自动化由于需要Xcode的支持,只能在Mac上运行,需要安装Xcode、Node等工具。此外,由于Appium ios自动化的底层使用的是UI Automation,因此在使用Appium之前必须搭建iOS开发环境。
一、搭建Appium环境
目前Appium测试iOS设备,要求Mac操作系统的最低版本是mac OS 版本10.7,本机使用的开发环境是Xcode 9.4.1, Mac x 10.13.3。由于时间有限下文截图可能不太清晰,请谅解。
1)安装brew
在终端输入命令 /usr/bin/ruby -e "$(curl -fsSL https://raw.githubusercontent.com/Homebrew/install/master/install)"
2)安装libimobiledevice
brew install libimobiledevice --HEAD
3)安装carthage
brew install carthage
4)安装node.js , https://nodejs.org/en/download/, 下载.pkg文件安装
5)安装cnpm https://npm.taobao.org/
npm install -g cnpm --registry=https://registry.npm.taobao.org

6)安装ios-deploy
sudo cnpm install -g ios –deploy
7)安装xcpretty
gem install xcpretty
安装的版本为xcpretty-0.3.0
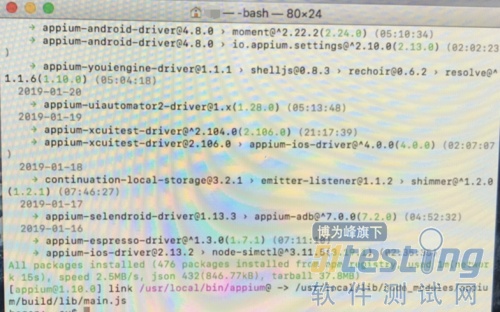
8)安装Appium1.10.0
sudo cnpm install -g Appium@1.6.3
9)安装Appium-xcuitest-driver依赖
(1)安装WebDriverAgent
首先要搭建WebDriverAgent编译环境,首先需要安装如下的软件:
Homebrew
carthage
python
node.js
Xcode8.0+(IOS9.3,Xcode8.0+才能正常编译)
安装Homebrew
/usr/bin/ruby -e "$(curl -fsSL https://raw.githubusercontent.com/Homebrew/install/master/install)"
安装WebDriverAgent
使用git clone命令将WebDriverAgent项目克隆到本地
git clone https://github.com/facebook/WebDriverAgent
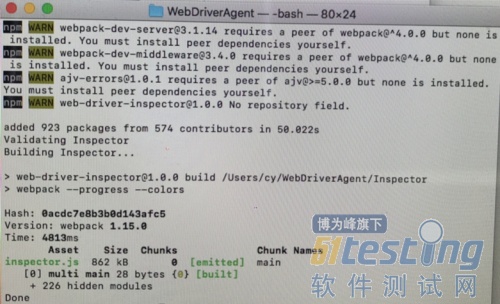
(2)安装Appium-xcuitest-driver依赖,进入WebDriverAgent安装目录,运行bootstrap
Cd/usr/local/lib/node_modules/Appium/node_modules/Appium-xcuitest-driver/WebDriverAgent
mkdir -p Resources/WebDriverAgent.bundle //执行脚本
sh ./Scripts/bootstrap.sh
如果出现报错,则关闭终端再打开,执行
9)下载WebDriverAgent-master
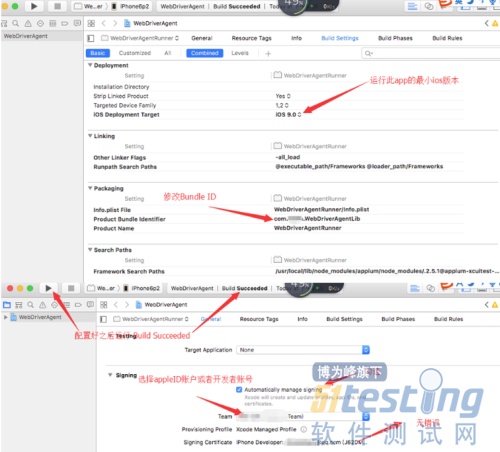
(1)Xcode打开WebDriverAgent.xcodeproj,修改配置:
选择菜单files->open,路径/usr/local/lib/node_modules/Appium/node_modules/Appium-xcuitest-driver/WebDriverAgent
(2)双击WebDriverAgentLib,设置后进行编译

按如下进行修改
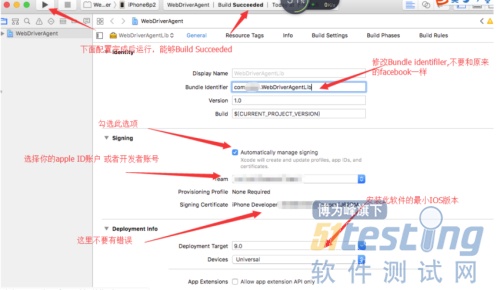
Bundle ID改为com.ming.wda.WebDriverAgentLib
修改配置WebDriverAgentRunner后编译
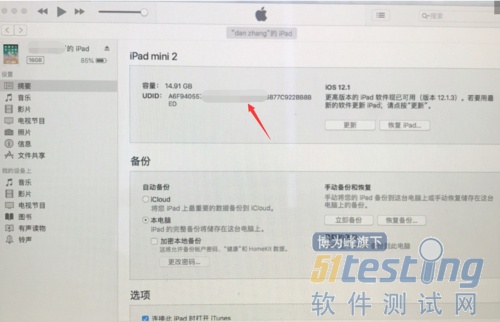
10)真机的udid通过iTunes—摘要,点击序列号,出现UDID,右键拷贝即可。
安装Appium-python-client

二、运行与测试
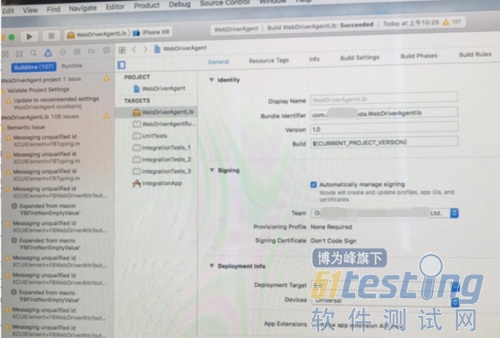
(1) Xcode 菜单栏选择目标设备,Scheme 选择 WebDriverAgentRunner,最后运行Product -> Test。一切正常的话,手机上会出现一个无图标的 WebDriverAgent 应用,启动之后,马上又返回到桌面。这是正常的。
此时控制台界面可以看到设备的 IP。如果看不到的话,使用这种方法打开 view-debug area-activate console

出现上图,表示成功了
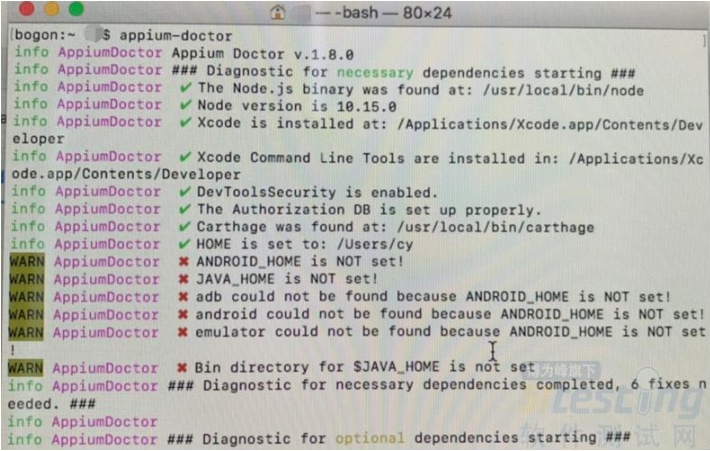
(2) 安装 Appium-doctor
确定所有依赖是否安装成功,可通过 Appium-doctor 验证,首先安装 Appium-doctor(sudo npm install -g Appium-doctor),然后在终端运行 Appium-doctor,如下图,都是打勾状态就证明环境正常。
(3) brew install – HEAD libimobiledevice
(4) 运行 Appium
终端执行 Appium – p 4723
三、启动 APP
第一步,Xcode 打开 WebDriverAgentRunner,scheme 选择它,菜单 Project->Test,
build 成功后在手机里装上 WebDriverAgent;第二步,手机连接 Mac 电脑;第三步,启动 Appium desk,start desired session;就可以自动测试 App 了。
欢迎加入 51软件测试大家庭,在这里你将获得【最新行业资讯】,【免费测试工具安装包】,【软件测试技术干货】,【面试求职技巧】... 51与你共同学习,一起成长!期待你的加入: QQ 群: 755431660