我相信人生是值得活的,尽管人在一生中必须遭受痛苦,卑劣,残酷,不幸和死亡的折磨,我依然深信如此.但我认为人生不一定要有意义,只是对一些人而言,他们可以使人生有意义. ---J 赫胥黎

摘要: 本文用实例介绍了在Eclipse如何进行Qt开发.希望对大家有帮助.
阅读全文
摘要: 文本介绍了JavaScript的OO 设计.
阅读全文
摘要: 本文对JS的function进行了讨论.
阅读全文
改写自下载包里自带的例子.
jsp:
@ page language="java" contentType="text/html; charset=UTF-8"%>]]>
jsp:include page="/jsp/globalConfig.jsp">span style="color: rgb(128, 0, 0);">jsp:include>
html>
head>
title>MessageBox Samplesspan style="color: rgb(128, 0, 0);">title>
script type="text/javascript" src="js/mbsample.js">span style="color: rgb(128, 0, 0);">script>
style type="text/css">
.x-window-dlg .ext-mb-download {
background:transparent url(images/download.gif) no-repeat top left;
height:46px;
}
span style="color: rgb(128, 0, 0);">style>
span style="color: rgb(128, 0, 0);">head>
body>
h1>MessageBox 对话框span style="color: rgb(128, 0, 0);">h1>
p>The example shows how to use the MessageBox class. Some of the buttons have animations, some are normal.span style="color: rgb(128, 0, 0);">p>
p>The js is not minified so it is readable. See a href="js/mbsample.js">Message-sample..jsspan style="color: rgb(128, 0, 0);">a>.span style="color: rgb(128, 0, 0);">p>
p>
b>Confirmspan style="color: rgb(128, 0, 0);">b><</span>br />
Standard Yes/No dialog.
button id="mb1">Showspan style="color: rgb(128, 0, 0);">button>
span style="color: rgb(128, 0, 0);">p>
p>
b>Promptspan style="color: rgb(128, 0, 0);">b><</span>br />
Standard prompt dialog.
button id="mb2">Showspan style="color: rgb(128, 0, 0);">button>
span style="color: rgb(128, 0, 0);">p>
p>
b>Multi-line Promptspan style="color: rgb(128, 0, 0);">b><</span>br />
A multi-line prompt dialog.
button id="mb3">Showspan style="color: rgb(128, 0, 0);">button>
span style="color: rgb(128, 0, 0);">p>
p>
b>Yes/No/Cancelspan style="color: rgb(128, 0, 0);">b><</span>br />
Standard Yes/No/Cancel dialog.
button id="mb4">Showspan style="color: rgb(128, 0, 0);">button>
span style="color: rgb(128, 0, 0);">p>
p>
b>Progress Dialogspan style="color: rgb(128, 0, 0);">b><</span>br />
Dialog with measured progress bar.
button id="mb6">Showspan style="color: rgb(128, 0, 0);">button>
span style="color: rgb(128, 0, 0);">p>
p>
b>Wait Dialogspan style="color: rgb(128, 0, 0);">b><</span>br />
Dialog with indefinite progress bar and custom icon (will close after 8 sec).
button id="mb7">Showspan style="color: rgb(128, 0, 0);">button>
span style="color: rgb(128, 0, 0);">p>
p>
b>Alertspan style="color: rgb(128, 0, 0);">b><</span>br />
Standard alert message dialog.
button id="mb8">Showspan style="color: rgb(128, 0, 0);">button>
span style="color: rgb(128, 0, 0);">p>
p>
b>Iconsspan style="color: rgb(128, 0, 0);">b><</span>br />
Standard alert with optional icon.
select id="icons">
option id="error" selected="selected">Errorspan style="color: rgb(128, 0, 0);">option>
option id="info">Informationalspan style="color: rgb(128, 0, 0);">option>
option id="question">Questionspan style="color: rgb(128, 0, 0);">option>
option id="warning">Warningspan style="color: rgb(128, 0, 0);">option>
span style="color: rgb(128, 0, 0);">select>
button id="mb9">Showspan style="color: rgb(128, 0, 0);">button>
span style="color: rgb(128, 0, 0);">p>
span style="color: rgb(128, 0, 0);">body>
span style="color: rgb(128, 0, 0);">html>
mbsample.js:
/*
* Ext JS Library 2.2.1
* Copyright(c) 2006-2009, Ext JS, LLC.
* licensing@extjs.com
*
* http://extjs.com/license
*/
Ext.onReady(function(){
Ext.get('mb1').on('click', function(e){
Ext.MessageBox.confirm('Confirm', 'Are you sure you want to do that?', showResult);
});
Ext.get('mb2').on('click', function(e){
Ext.MessageBox.prompt('Name', 'Please enter your name:', showResultText);
});
Ext.get('mb3').on('click', function(e){
Ext.MessageBox.show({
title: 'Address',
msg: 'Please enter your address:',
width:300,
buttons: Ext.MessageBox.OKCANCEL,
multiline: true,
fn: showResultText,
animEl: 'mb3'
});
});
Ext.get('mb4').on('click', function(e){
Ext.MessageBox.show({
title:'Save Changes?',
msg: 'You are closing a tab that has unsaved changes. br />Would you like to save your changes?',
buttons: Ext.MessageBox.YESNOCANCEL,
fn: showResult,
animEl: 'mb4',
icon: Ext.MessageBox.QUESTION
});
});
Ext.get('mb6').on('click', function(){
Ext.MessageBox.show({
title: 'Please wait',
msg: 'Loading items ',
',
progressText: 'Initializing',
width:300,
progress:true,
closable:false,
animEl: 'mb6'
});
// this hideous block creates the bogus progress
var f = function(v){
return function(){
if(v == 12){
Ext.MessageBox.hide();
Ext.example.msg('Done', 'Your fake items were loaded!');
}else{
var i = v/11;
Ext.MessageBox.updateProgress(i, Math.round(100*i)+'% completed');
}
};
};
for(var i = 1; i 13; i++){
setTimeout(f(i), i*500);
}
});
Ext.get('mb7').on('click', function(){
Ext.MessageBox.show({
msg: 'Saving your data, please wait',
progressText: 'Saving',
width:300,
wait:true,
waitConfig: {interval:200},
icon:'ext-mb-download', //custom class in msg-box.html
animEl: 'mb7'
});
setTimeout(function(){
//This simulates a long-running operation like a database save or XHR call.
//In real code, this would be in a callback function.
Ext.MessageBox.hide();
//Ext.example.msg('Done', 'Your fake data was saved!');
}, 8000);
});
Ext.get('mb8').on('click', function(){
Ext.MessageBox.alert('Status', 'Changes saved successfully.', showResult);
});
//Add these values dynamically so they aren't hard-coded in the html
Ext.fly('info').dom.value = Ext.MessageBox.INFO;
Ext.fly('question').dom.value = Ext.MessageBox.QUESTION;
Ext.fly('warning').dom.value = Ext.MessageBox.WARNING;
Ext.fly('error').dom.value = Ext.MessageBox.ERROR;
Ext.get('mb9').on('click', function(){
Ext.MessageBox.show({
title: 'Icon Support',
msg: 'Here is a message with an icon!',
buttons: Ext.MessageBox.OK,
animEl: 'mb9',
fn: showResult,
icon: Ext.get('icons').dom.value
});
});
function showResult(btn){
//Ext.example.msg('Button Click', 'You clicked the {0} button', btn);
};
function showResultText(btn, text){
//Ext.example.msg('Button Click', 'You clicked the {0} button and entered the text "{1}".', btn, text);
};
});
一 简介
Ext 是目前最火爆的javascript框架. 原名yui-ext,是yahoo yui的补充, 后来另起炉灶,名字也更改为ExtJs.最新版本是2.2.1,你可以从这里下载:
http://extjs.com/products/extjs/download.php?dl=extjs221YUI和Ext各有优缺点. 论开发的灵活度和性能,YUI更好. 论集成功能之多和界面漂亮,Ext更胜一筹.如果你是一个纯粹的开发人员,美工水平一般,那么用ExtJs来开发网站实在再好不过,你可以借助ExtJs自身类库实现许多很酷很炫的效果.
二 起步
和YUI的大气不同,Ext是想在市场上赚点银子的.所以Ext的官方文档/资源相比YUI来说较为缺乏,入门不易.如果想要学习Ext,建议从以下几步着手:
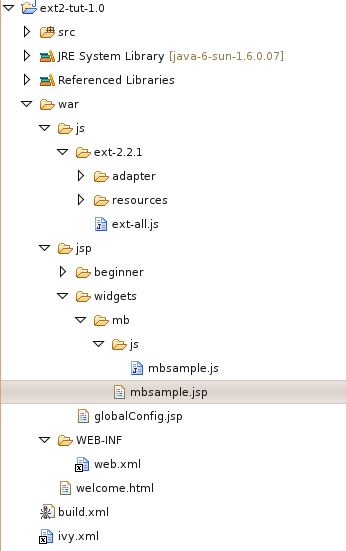
三 实例的代码结构
教程的源程序按照jsp的war格式进行组织,目录结构如下:
globalConfig.jsp 的内容:
-- Ext config . --%>]]>
link rel="stylesheet" type="text/css" href="<%=request.getContextPath()%>/js/ext-2.2.1/resources/css/ext-all.css" />
script type="text/javascript" src="<%=request.getContextPath()%>/js/ext-2.2.1/adapter/ext/ext-base.js">span style="color: rgb(128, 0, 0);">script>
script type="text/javascript" src="<%=request.getContextPath()%>/js/ext-2.2.1/ext-all.js">span style="color: rgb(128, 0, 0);">script>
1 遍历文件夹和文件
import
os
import
os.path
#
os,os.path里包含大多数文件访问的函数,所以要先引入它们.
#
请按照你的实际情况修改这个路径
rootdir
=
"
d:/download
"
for
parent, dirnames, filenames
in
os.walk(rootdir):
#
case 1:
for
dirname
in
dirnames:
print
(
"
parent is:
"
+
parent)
print
(
"
dirname is:
"
+
dirname)
#
case 2
for
filename
in
filenames:
print
(
"
parent is:
"
+
parent)
print
(
"
filename with full path :
"
+
os.path.join(parent, filename))
'''
知识点:
* os.walk返回一个三元组.其中dirnames是所有文件夹名字(不包含路径),filenames是所有文件的名字(不包含路径).parent表示父目录.
* case1 演示了如何遍历所有目录.
* case2 演示了如何遍历所有文件.
* os.path.join(dirname,filename) : 将形如"/a/b/c"和"d.java"变成/a/b/c/d.java".
'''
2 分割路径和文件名
import
os.path
#
常用函数有三种:分隔路径,找出文件名.找出盘符(windows系统),找出文件的扩展名.
#
根据你机器的实际情况修改下面参数.
spath
=
"
D:/download/repository.7z
"
#
case 1:
p,f
=
os.path.split(spath);
print
(
"
dir is:
"
+
p)
print
(
"
file is:
"
+
f)
#
case 2:
drv,left
=
os.path.splitdrive(spath);
print
(
"
driver is:
"
+
drv)
print
(
"
left is:
"
+
left)
#
case 3:
f,ext
=
os.path.splitext(spath);
print
(
"
f is:
"
+
f)
print
(
"
ext is:
"
+
ext)
'''
知识点: 这三个函数都返回二元组.
* case1 分隔目录和文件名
* case2 分隔盘符和文件名
* case3 分隔文件和扩展名
'''
总结:5个函数
- os.walk(spath)
- os.path.split(spath)
- os.path.splitdrive(spath)
- os.path.splitext(spath)
- os.path.join(path1,path2)
3 复制文件
import
shutil
import
os
import
os.path
src
=
"
d:\\download\\test\\myfile1.txt
"
dst
=
"
d:\\download\\test\\myfile2.txt
"
dst2
=
"
d:/download/test/测试文件夹.txt
"
dir1
=
os.path.dirname(src)
print
(
"
dir1 %s
"
%
dir1)
if
(os.path.exists(src)
==
False):
os.makedirs(dir1)
f1
=
open(src,
"
w
"
)
f1.write(
"
line a\n
"
)
f1.write(
"
line b\n
"
)
f1.close()
shutil.copyfile(src, dst)
shutil.copyfile(src, dst2)
f2
=
open(dst,
"
r
"
)
for
line
in
f2:
print
(line)
f2.close()
#
测试复制文件夹树
try
:
srcDir
=
"
d:/download/test
"
dstDir
=
"
d:/download/test2
"
#
如果dstDir已经存在,那么shutil.copytree方法会报错!
#
这也意味着你不能直接用d:作为目标路径.
shutil.copytree(srcDir, dstDir)
except
Exception as err:
print
(err)
'''
知识点:
* shutil.copyfile:如何复制文件
* os.path.exists:如何判断文件夹是否存在
* shutil.copytree:如何复制目录树
'''
总结:4个函数
- os.path.dirname(path)
- os.path.exists(path)
- shutil.copyfile(src, dst)
- shutil.copytree(srcDir, dstDir)
4 实战:文件备份小程序
import
os
import
shutil
import
datetime
'''
作用:将目录备份到其他路径。
实际效果:
假设给定目录"/media/data/programmer/project/python" ,
备份路径"/home/diegoyun/backup/“ ,
则会将python目录备份到备份路径下,形如:
/home/diegoyun/backup/yyyymmddHHMMSS/python/xxx/yyy/zzz..
用法:更改这两个参数.
backdir:备份目的地.
copydirs:想要备份的文件夹.
'''
def
mainLogic():
#
add dirs you want to copy
backdir
=
"
d:\\test
"
print
(backdir)
copydirs
=
[]
copydirs.append(
"
d:\\temp
"
);
#
copydirs.append("d:\\test");
print
(
"
Copying files ===================
"
)
start
=
datetime.datetime.now()
#
gen a data folder for backup
backdir
=
os.path.join(backdir,start.strftime(
"
%Y-%m-%d
"
))
#
print("backdir is:"+backdir)
kc
=
0
for
d
in
copydirs:
kc
=
kc
+
copyFiles(d,backdir)
end
=
datetime.datetime.now()
print
(
"
Finished! ===================
"
)
print
(
"
Total files :
"
+
str(kc) )
print
(
"
Elapsed time :
"
+
str((end
-
start).seconds)
+
"
seconds
"
)
def
copyFiles(copydir,backdir):
prefix
=
getPathPrefix(copydir)
#
print("prefix is:"+prefix )
i
=
0
for
dirpath,dirnames,filenames
in
os.walk(copydir):
for
name
in
filenames:
oldpath
=
os.path.join(dirpath,name)
newpath
=
omitPrefix(dirpath,prefix)
print
(
"
backdir is:
"
+
backdir )
newpath
=
os.path.join(backdir,newpath)
print
(
"
newpath is:
"
+
newpath)
if
os.path.exists(newpath)
!=
True:
os.makedirs(newpath)
newpath
=
os.path.join(newpath,name)
print
(
"
From:
"
+
oldpath
+
"
to:
"
+
newpath)
shutil.copyfile(oldpath,newpath)
i
=
i
+
1
return
i
def
getPathPrefix(fullpath):
#
Giving /media/data/programmer/project/ , get the prefix
#
/media/data/programmer/
l
=
fullpath.split(os.path.sep)
#
print(str(l[-1]=="")
if
l[
-
1
]
==
""
:
tmp
=
l[
-
2
]
else
:
tmp
=
l[
-
1
]
return
fullpath[0:len(fullpath)
-
len(tmp)
-
1
]
def
omitPrefix(fullpath,prefix):
#
Giving /media/data/programmer/project/python/tutotial/file/test.py ,
#
and prefix is Giving /media/data/programmer/project/,
#
return path as python/tutotial/file/test.py
return
fullpath[len(prefix)
+
1
:]
mainLogic()
5 资源:方法详解
你可以在这里看到更多的api解释,感谢该作者:
http://www.cnpython.org/docs/200/p_119.html
摘要: Python已经是3.1版本了,与时俱进更新教程.(由于Django不支持python3, 所以为了你的发展潜力, 建议你学习python2.x)python 2.x教程地址: http://www.cnitblog.com/yunshichen/archive/2008/05/09/43527.html本文适合有Java编程经验的程序员快速熟悉Python本文程序在windows xp+pyth...
阅读全文
介绍
本文方便有经验的程序员进入Python世界.本文适用于python2.5/2.6版本.
Deparecated:Python3 和 python2.x语法不同.如果你正在用python3,请参考新教程:
http://www.cnitblog.com/yunshichen/archive/2009/04/01/55924.html起步走
#! /usr/bin/python
a=2
b=3
c="test"
c=a+b
print "execution result: %i"%c
知识点
- Python是动态语言,变量不须预先声明.
- 打印语句采用C风格
字符串和数字
但有趣的是,在javascript里我们会理想当然的将字符串和数字连接,因为是动态语言嘛.但在Python里有点诡异,如下:
#! /usr/bin/python
a=2
b="test"
c=a+b
运行这行程序会出错,提示你字符串和数字不能连接,于是只好用内置函数进行转换
#! /usr/bin/python
a=2
b="test"
c=str(a)+b
d="1111"
e=a+int(d)
#How to print multiply values
print "c is %s,e is %i" % (c,e)
知识点:
- 用int和str函数将字符串和数字进行转换
- 打印以#开头,而不是习惯的//
- 打印多个参数的方式
国际化
写腻了英文注释,我们要用中文!
#! /usr/bin/python
# -*- coding: utf8 -*-
print "上帝重返人间:马拉多纳出任阿根廷国家足球队主帅."
知识点:
列表
列表类似Javascript的数组,方便易用
#! /usr/bin/python
# -*- coding: utf8 -*-
#定义元组
word=['a','b','c','d','e','f','g']
#如何通过索引访问元组里的元素
a=word[2]
print "a is: "+a
b=word[1:3]
print "b is: "
print b # index 1 and 2 elements of word.
c=word[:2]
print "c is: "
print c # index 0 and 1 elements of word.
d=word[0:]
print "d is: "
print d # All elements of word.
#元组可以合并
e=word[:2]+word[2:]
print "e is: "
print e # All elements of word.
f=word[-1]
print "f is: "
print f # The last elements of word.
g=word[-4:-2]
print "g is: "
print g # index 3 and 4 elements of word.
h=word[-2:]
print "h is: "
print h # The last two elements.
i=word[:-2]
print "i is: "
print i # Everything except the last two characters
l=len(word)
print "Length of word is: "+ str(l)
print "Adds new element"
word.append('h')
print word
#删除元素
del word[0]
print word
del word[1:3]
print word
知识点:
- 列表长度是动态的,可任意添加删除元素.
- 用索引可以很方便访问元素,甚至返回一个子列表
- 更多方法请参考Python的文档
字典
#! /usr/bin/python
x={'a':'aaa','b':'bbb','c':12}
print x['a']
print x['b']
print x['c']
for key in x:
print "Key is %s and value is %s",(key,x[key])
keys=x.items();
print keys[0]
keys[0]='ddd'
print keys[0]
知识点:
字符串
比起C/C++,Python处理字符串的方式实在太让人感动了.把字符串当列表来用吧.
word="abcdefg"
a=word[2]
print "a is: "+a
b=word[1:3]
print "b is: "+b # index 1 and 2 elements of word.
c=word[:2]
print "c is: "+c # index 0 and 1 elements of word.
d=word[0:]
print "d is: "+d # All elements of word.
e=word[:2]+word[2:]
print "e is: "+e # All elements of word.
f=word[-1]
print "f is: "+f # The last elements of word.
g=word[-4:-2]
print "g is: "+g # index 3 and 4 elements of word.
h=word[-2:]
print "h is: "+h # The last two elements.
i=word[:-2]
print "i is: "+i # Everything except the last two characters
l=len(word)
print "Length of word is: "+ str(l)
不过要注意Asc和Unicode字符串的区别:
#! /usr/bin/python
# -*- coding: utf8 -*-
s=raw_input("输入你的中文名,按回车继续");
print "你的名字是 : " +s;
l=len(s)
print "你中文名字的长度是:"+str(l);
a=unicode(s,"utf8")
l=len(a)
print "对不起,刚才计算错误.我们应该用utf8来计算中文字符串的长度, \
你名字的长度应该是:"+str(l); 知识点:
条件和循环语句
#! /usr/bin/python
x=int(raw_input("Please enter an integer:"))
if x<0:
x=0
print "Negative changed to zero"
elif x==0:
print "Zero"
else:
print "More"
# Loops List
a = ['cat', 'window', 'defenestrate']
for x in a:
print x, len(x)
知识点:
函数
#! /usr/bin/python
# -*- coding: utf8 -*-
def sum(a,b):
return a+b
func = sum
r = func(5,6)
print r
# 提供默认值
def add(a,b=2):
return a+b
r=add(1)
print r
r=add(1,5)
print r
一个好用的函数
#! /usr/bin/python
# -*- coding: utf8 -*-
# The range() function
a =range(5,10)
print a
a = range(-2,-7)
print a
a = range(-7,-2)
print a
a = range(-2,-11,-3) # The 3rd parameter stands for step
print a
知识点:
- Python 不用{}来控制程序结构,他强迫你用缩进来写程序,使代码清晰.
- 定义函数方便简单
- 方便好用的range函数
异常处理
#! /usr/bin/python
s=raw_input("Input your age:")
if s =="":
raise Exception("Input must no be empty.")
try:
i=int(s)
except ValueError:
print "Could not convert data to an integer."
except:
print "Unknown exception!"
else: # It is useful for code that must be executed if the try clause does not raise an exception
print "You are %d" % i," years old"
finally: # Clean up action
print "Goodbye!"
Squirrel Sql Client 是个相当不错的sql客户端.支持oracle,mysql,hsql等多种数据库.java写的,跨平台,强力推荐.
官方网站:
http://www.squirrelsql.org/
Qt简介和安装
最近打算重拾gui编程.vb/vc 已经忘得快差不多了,用java太繁琐,python嘛... 想复习复习c++语法,于是想到用Qt Designer , 支持C++/JAVA/PYTHON ,就算换一种语言,gui的知识还可以迁移--要熟悉一个gui编程环境也不容易.我不想花了很多时间学gui,换种语言后又把这个gui知识扔了.
Qt 的优点:
1.如上所述,支持多种语言.
2.跨平台.当然,用Java/Python能轻易写出跨平台代码,C++要注意别引入平台相关的库.
3.免费.
4.简单.和vb/delphi的难度差不多.
5.界面漂亮.
Qt安装
用ubuntu鼓捣东东是件挺快乐的事情.起码不用四处找软件,例如安装相关软件就很简单:
sudo apt-get install qt4-dev-tools qt4-doc qt4-qtconfig qt4-designer ctags
如果本机还没有安装C++开发环境,那你还需要:
sudo apt-get install build-essential g++ gcc-4.2-doc
IDE->qdevelop
你可以选择Qdevelop,和Qt绑定的一个小巧而强大的开发工具.
sudo apt-get install qdevelop
IDE->Eclipse
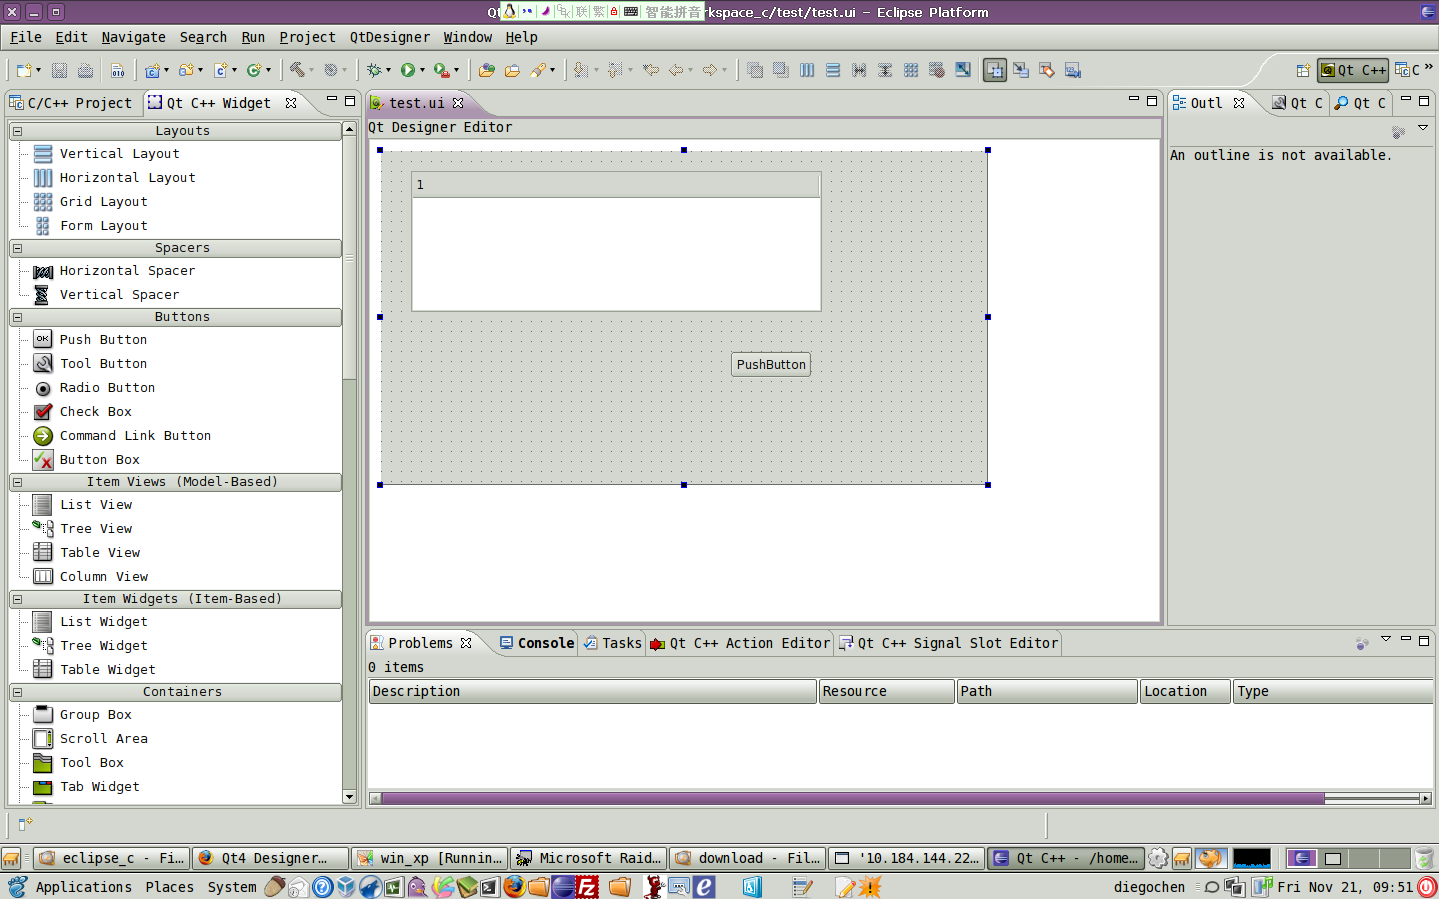
当然,还可以选择Eclipse.安装Java,下载Eclipse CDT , 然后到这个网站下载Qt plugin :
http://trolltech.com/developer/eclipse-integration 并进行安装.
以前是没有这个plugin的,嘿嘿,现在做程序就是幸福.
打开Eclipse , 在"Window->Preference->qt" 里配置如下信息:
- Name : Qt4
- Bin Path : /usr/bin
- Include Path : /usr/include/qt4
这是Ubuntu8.04 默认安装的qt4路径.如果你的路径和此不同,请自行修改.
然后,New一个Qt Project 看看效果,怀旧的同学们,这是不是让你想起曾经的Delphi?
更新时间:2008-11-20
感谢
Ubuntu下配置Qt开发环境How_to_use_Eclipse_with_Qt4